Learn SvelteKit Hooks Through Example
Published Feb 22, 2023
Table of Contents
- Previously
- What Are Hooks?
- Creating Routes
- Authentication
- Transforming HTML
- Measuring Page Load Speed
- Error Logging
- Modifying A Fetch Response
- Parsing Form Data
- Using Multiple Hooks Together
Previously
This is part of a SvelteKit series and while each part is meant to be self-contained here are the previous parts in case you want to catch up:
- What is SvelteKit?
- SvelteKit Project Structure
- SvelteKit Routing
- SvelteKit API Endpoints And Loading Data For Pages
- Working With Forms In SvelteKit
- Using Advanced Layouts In SvelteKit
What Are Hooks?
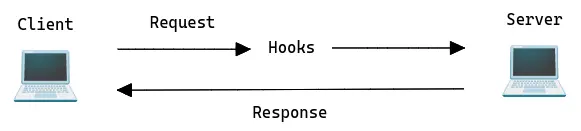
Hooks can mean different things depending where you come from but in the case of SvelteKit hooks are just another name for middleware.
Middleware is a name for a function that intercepts a request to the server before it’s completed and lets you modify the response.
Here are some of the things hooks are used for:
- Authentication
- Modifying the response
- Error and performance logging
- Creating automatic routes
SvelteKit uses a special hooks.server.ts or hooks.client.ts file to respond to specific events on the server and client and provides server hooks like handle and handleFetch and shared hooks like handleError.
Instead of boring you with theory I want to show you some real world examples of using hooks to spark your imagination.
Creating Routes
The most used and powerful hook is the handle hook which runs each time the SvelteKit server receives a request and determines the response.
I’m going to create a file inside src/hooks.server.ts and use the handle hook from SvelteKit.
export async function handle({ event, resolve }) {
  return resolve(event)
}
If you didn’t add a hooks file this is the default behavior.
The handle function takes an input object that has event and resolve. The event object has the request and resolve is a function that renders the route and creates the response.
If you wanted you could turn every route in your app into a banana.
export async function handle({ event, resolve }) {
  return new Response('🍌')
}
Notice that even if you go to a route that doesn’t exist it’s going to return a banana — in that case you might want to be more precise.
export async function handle({ event, resolve }) {
  // if route matches "/banana" return banana
  if (event.url.pathname.startsWith('/banana')) {
    return new Response('🍌')
  }

  // otherwise use the default behavior
  return resolve(event)
}
You just created a route through code which can be useful if you’re making some library and don’t want to make the user create a route.
Let’s look at more examples that use hooks.
Authentication
Since hooks happen on every request they’re a perfect candidate for authentication inside of which you can read or set a cookie and talk to a database.
I have an entire post on authentication using cookies in SvelteKit if you want to learn more but if you use an auth library it’s going to provide a hook that has the auth logic.
export async function handle({ event, resolve }) {
  // this cookie would be set inside a login route
  // const session = event.cookies.get('session')

  // you can get the user data from a database
  // const user = await getUser(session)

  // this is passed to `event` inside server `load` functions
  // and passed to handlers inside `+page.ts`
  event.locals.user = 'Test'

  return resolve(event)
}
You can pass any data you want like user data in this example to a request. The populated event.locals object becomes available inside server load functions and handlers inside +page.ts.
export async function load({ locals }) {
  return { user: locals.user }
}
In a previous part we learned that data sent from a layout load function gets merged with data in child routes but it also becomes available inside the $page.data store.
<script lang="ts">
  import { page } from '$app/stores'
</script>

{#if $page.data.user}
  Welcome {$page.data.user}!
{/if}
The authentication runs on every request which is going to update event.locals inside the hook and in turn updates $page.data.
If you’re looking for a SvelteKit auth library that just works I recommend trying out Lucia.
Transforming HTML
If you do internalization you want to be able to change the <html> language attribute to the user locale.
<html lang="%lang%">The resolve function has a second parameter that gives you more control how to render the response. One of the options is the transformPageChunk function that you can use to change the HTML.
export async function handle({ event, resolve }) {
  // you can get the locale from `event.cookies`
  const locale = 'hr'

  // pass to `event.locals` as before
  event.locals.locale = locale

  return resolve(event, {
    // replace the `lang` attribute
    transformPageChunk: ({ html }) => html.replace('%lang%', locale),
  })
}
The HTML is just a string, so you have to be careful you return proper HTML.
Measuring Page Load Speed
You can use hooks to measure how long a response takes and provide logs in development, so you’re aware of potential problems.
export async function handle({ event, resolve }) {
  const route = event.url

  let start = performance.now()
  const response = await resolve(event)
  let end = performance.now()

  let responseTime = end - start

  if (responseTime > 2000) {
    console.log(`🐢 ${route} took ${responseTime.toFixed(2)} ms`)
  }

  if (responseTime < 1000) {
    console.log(`🚀 ${route} took ${responseTime.toFixed(2)} ms`)
  }

  return response
}
If the response takes longer than 2000 ms then you log a turtle but if it’s under 1000 ms you can log a rocket.
Error Logging
You can use services like Sentry or LogRocket to get more insight how your site is performing including error tracking.
This is a perfect use case for the handleError hook in SvelteKit which is a shared hook you can use to log client and server errors.
The handleError function is going to run if an unexpected error is thrown during loading or rendering.
export async function load() {
  // this error message including the stack trace
  // can be handled securely on the server
  throw new Error('The secret phrase is banana')
}export async function handleError({ error, event }) {
// you can capture the `error` and `event` from the server
console.log(error)
return {
// don't show sensitive data to the user
message: 'Yikes! 💩',
}
}You can log or pass the error to some error tracking service and you can show a message that doesn’t include sensitive data like the stack trace to the user.
One thing you should know is that the handleError inside hooks.client.ts only runs if the unexpected error happens inside +page.ts which is a current limitation of Svelte despite the SvelteKit docs saying otherwise.
export async function handleError({ error, event }) {
  // you can capture the `error` and `event` from the client
  // but it only runs if the unexpected error comes from `+page.ts`
  console.log(error)

  return {
    // don't show sensitive data to the user
    message: 'Yikes! 💩',
  }
}
Modifying A Fetch Response
You can use the handleFetch hook to modify a fetch request in a load or action function that runs on the server.
To be honest I don’t know a lot of use cases for this one other than to make a direct request on the server instead of going through a proxy but you might have a use case for it.
Let’s say I want every request to use HTTPS.
export async function load({ fetch }) {
  await fetch('http://joyofcode.xyz/') // yikes! 👎️
}
I’m going to listen to any request URL that starts with http and create a new Request.
export async function handleFetch({ request, fetch }) {
  if (request.url.startsWith('http')) {
    const url = request.url.replace('http', 'https')
    request = new Request(url, request)

    console.log(request.url) // https://joyofcode.xyz/ 👍

    // you can set the request headers
    request.headers.set('x-secure', 'Blessed')

    // you can pass cookies for cross-origin requests
    request.headers.set('cookie', event.request.headers.get('cookie'))
  }

  return fetch(request)
}
How awesome is that? 😄
Parsing Form Data
This is something cool I learned from @stolinski from the sk-form-data hook he made that makes it easier to work with forms in SvelteKit.
There’s a lot of boilerplate when working with forms because you have to parse individual values using FormData or loop over the values but you can make a hook that listens to a POST request and gives you the parsed form data you can validate using Zod.
import { parseFormData } from 'parse-nested-form-data'

export async function handle({ event, resolve }) {
  // listen to a "POST" request
  if (event.request.method === 'POST') {
    // get the form data from the request
    const formData = await event.request.formData()

    // parse the form data into a JSON object
    const data = parseFormData(formData)

    // make it available inside `actions`
    event.locals.formData = data
  }

  return resolve(event)
}
Use a form the same as you would before and keep in mind the name attribute is important for the values.
<script lang="ts">
  import { enhance } from '$app/forms'
</script>

<form method="POST" use:enhance>
  <label for="username">
    Username
    <input type="text" name="username" id="username" />
  </label>

  <label for="password">
    Password
    <input type="password" name="password" id="password" />
  </label>

  <label for="remember">
    <input type="checkbox" name="&remember" id="remember" />
    Remember me
  </label>

  <button type="submit">Log in</button>
</form>
Inside your form actions you get access to the parsed form data.
export const actions = {
  default: async ({ locals }) => {
    console.log(locals.formData) // { username: 'Test', password: '1234', remember: true }

    // ...
  },
}
If you’re using TypeScript you have to type Locals inside src/app.d.ts.
declare global {
  namespace App {
    interface Locals {
      formData: Record<string, unknown>
    }
  }
}

export {}
Form input values can only be strings which is weird when you’re dealing with a checkbox because it returns a on value when checked but parse-nested-form-data is neat because you can prefix the name prop with & and it’s going to transform the value into a boolean.
Using Multiple Hooks Together
You can use the sequence helper function from SvelteKit if you want to use multiple hooks together.
const auth: Handle = async ({ event, resolve }) => {
  // auth hook logic
  console.log('auth hook')

  return resolve(event)
}

const i18n: Handle = async ({ event, resolve }) => {
  // internationalization hook logic
  console.log('internationalization hook')

  return resolve(event)
}

export const handle = sequence(auth, i18n)
That’s it! 😄
SvelteKit hooks are very powerful and I hope you now understand how they work and when to reach for them if you have to.
In the next part you’re going to learn how to deploy your SvelteKit project.