Everything About SvelteKit Routing
Published Dec 28, 2022
Table of Contents
- Previously
- Requirements
- Project Setup
- Pages
- Layout
- The Power Of Nested Routes
- Dynamic Routes
- Multiple Route Parameters
- Optional Parameters
- Rest Parameters
- Matching Parameters
Previously
This is part of a SvelteKit series and while each part is meant to be self-contained here are the previous parts in case you want to catch up:
Requirements
In the previous parts we explored What is SvelteKit? and explained the SvelteKit project structure but things are about to get real.
If you’re just starting learning SvelteKit and want to follow along you’re going to need Node.js and I recommend using VS Code as the editor and using the Svelte for VS Code extension for syntax highlighting and code snippets for Svelte components.
Another option is going to sveltekit.new that’s going to create a new SvelteKit project on StackBlitz which is mind-blowing because it runs Node.js in the browser and feels faster than your local develoment environment.
Project Setup
I’m going to initialize a skeleton SvelteKit project with TypeScript but even if you use JavaScript the code is going to be the same.
# create SvelteKit project
npm create svelte@latest

# install dependencies
npm i

# run development server
npm run dev
Pages
SvelteKit uses file-based routing where routes of your app are defined by the directories in your project.
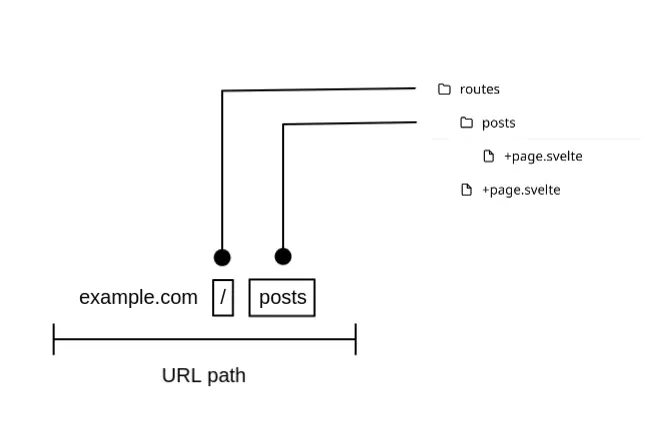
The routes are defined inside a src/routes folder. Each directory inside the routes folder can have or more route files using the + prefix.
To define a page in SvelteKit you use a +page.svelte file which becomes a route that maps to a URL.
For example the default route src/routes/+page.svelte maps to / in the browser.
<nav>
  <a href="/">Home</a>
  <a href="/posts">Posts</a>
</nav>

<h1>Home page</h1>
The page component gets rendered twice — on the server (SSR) for the initial request and on the client (CSR) because of hydration which is just a fancy word that means adding JavaScript for interactivity to the page after the server returns the HTML document.
<script lang="ts">
  console.log('Hello')
</script>

<!-- ... -->
Refresh the page and the output in your terminal and the browser console should say “Hello” because the component gets rendered on the server and the client.
I want you to understand what a page is and that it matches your mental model because it’s going to save you a lot of trouble in the future.
A page is just a Svelte component which you can see for yourself if you press Ctrl + Shift + I to open the developer tools and navigate to the network tab and look at the response for +page.svelte.
Notice also if you look at the localhost response in your developer tools it returns the entire HTML document.
If you look at the response for the HTML document you can see a script at the bottom of the page responsible for hydration and initializing the client-side router.
<!-- ... -->

<script type="module" data-sveltekit-hydrate="hz9k9a">
  import { start } from "@sveltejs/kit/src/runtime/client/start.js";

  start({
    env: {},
    paths: {"base":"","assets":""},
    target: document.querySelector('[data-sveltekit-hydrate="hz9k9a"]').parentNode,
    version: "1671890399040",
    hydrate: {
      node_ids: [0, 3],
      data: [null,null],
      form: null
    }
  });
</script>
I’m going to add a second route src/routes/posts/+page.svelte which maps to /posts.
<nav>
  <a href="/">Home</a>
  <a href="/posts">Posts</a>
</nav>

<h1>Posts page</h1>
Because +page.svelte is reserved in SvelteKit it knows to ignore other files like components which means you can collocate code that’s related to your route and don’t have to use special naming conventions.
I mentioned how pages are just components and just like regular components they’re mounted and destroyed on navigation.
<script lang="ts">
  import { onDestroy, onMount } from 'svelte'

  onMount(() => console.log('Mounted home page'))
  onDestroy(() => console.log('Unmounted home page'))
</script>

<!-- ... --><script lang="ts">
import { onDestroy, onMount } from 'svelte'
onMount(() => console.log('Mounted posts page'))
onDestroy(() => console.log('Unmounted posts page'))
</script>
<!-- ... -->If you navigate between the pages you should see the output in your console. You can also use regular Svelte transitions for pages since pages are just Svelte components.
Notice how the only thing that loads when navigating between the pages is the data for the page because it’s using CSR (client-side rendering) but if you refresh the page it’s going to SSR (server-side render) the page and load the client-side router for a SPA (single page application) experience.
The data preloading is thanks to the data-sveltekit-preload-data="hover" attribute on <body> in src/app.html which means when your mouse hovers over a link it’s going to start preloading the data for the page which you can set for the entire app or individual links.
Layout
Our two pages share the same navigation. You could create a <Navigation> component and use it where you need it but SvelteKit has a solution for reusing layouts which is using a +layout.svelte file.
The root layout is also where you import global styles.
body {
  padding: 2rem;
}

h1 {
  line-height: 1;
  text-transform: capitalize;
}
Import any global styles and shared layout inside +layout.svelte.
<script lang="ts">
  // global styles
  import '../app.css'
</script>

<nav>
  <a href="/">Home</a>
  <a href="/posts">Posts</a>
</nav>

<slot />
The +layout.svelte runs on the server and client.
The <slot /> element comes from Svelte and is used to show the page content in SvelteKit since a page is just a component.
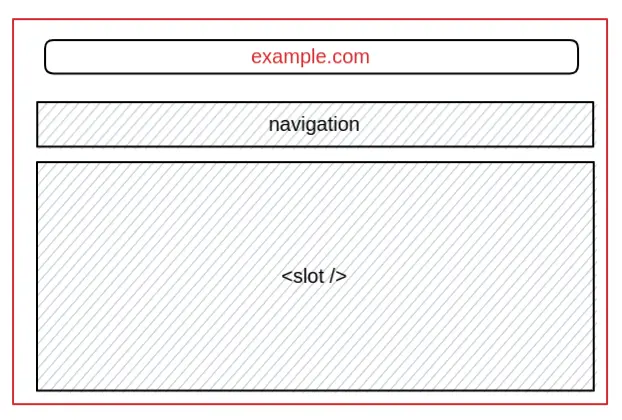
You can include repeating content here like a navigation, sidebar or a footer and it’s going to be repeated for every child route.
This is how slots work behind the scenes in SvelteKit.
<Layout>
<!--
A slot lets other content through and as you
navigate to a route it mounts the component for
that page and unmounts the old component.
You might find `.svelte-kit/generated/root.svelte`
interesting if you want to see how it's generated.
-->
<!-- mounts +page.svelte for `/` -->
<Home />
<!-- mounts posts/+page.svelte for `/posts` -->
<Posts />
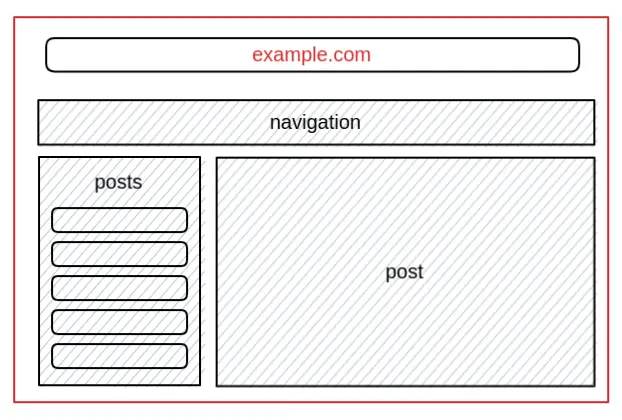
<Layout/>The Power Of Nested Routes
You can nest layouts as much as you want.
Let’s say I want a /posts route where I can always see the existing posts on the side and view the one I select on the right.
<h1>Posts page</h1>

<p>
  You can
  <a href="/posts/create">+create</a>
  or edit your posts here.
</p>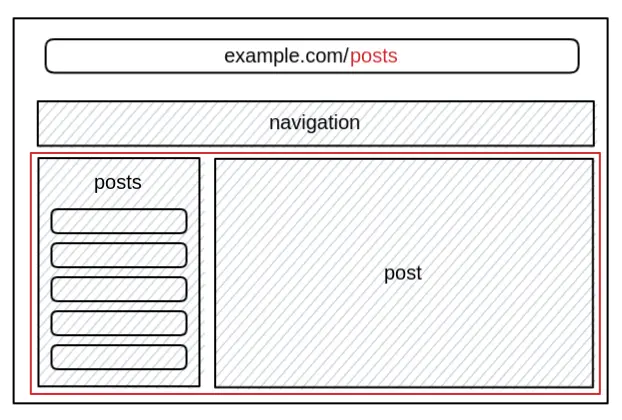
I can create another +layout.svelte file inside src/routes/posts/+layout.svelte that other child routes inside can inherit and everything already inherits the root layout that has the navigation.
<div class="posts">
  <aside>
    <h4>Posts</h4>

    <nav>
      <ul>
        <li>
          <a href="/posts/one">One</a>
        </li>
        <li>
          <a href="/posts/two">Two</a>
        </li>
      </ul>
    </nav>
  </aside>

  <main>
    <slot />
  </main>
</div>

<style>
  .posts {
    display: grid;
    gap: 2rem;
    grid-template-columns: 200px 60ch;
    margin-top: 2rem;
  }
</style>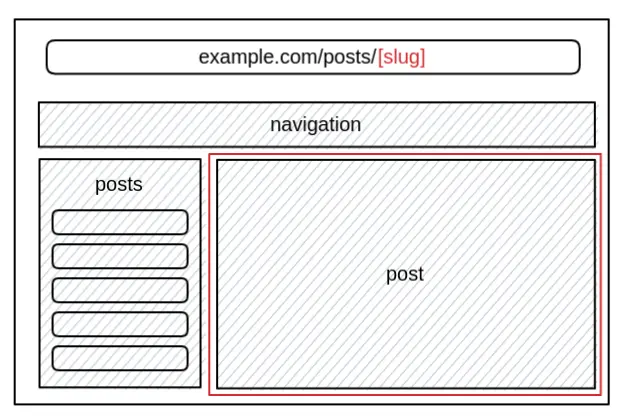
You can create child routes for posts like /posts/create or /posts/edit and it would inherit the src/routes/posts/+layout.svelte layout.
<h1>Create new post</h1>

<p>Create a new post.</p>
The real superpower of nested routes is that SvelteKit knows what data to fetch for a particular route and one part of your app crashing doesn’t take everything down with it.
import { error } from '@sveltejs/kit'

export async function load () {
  // unexpected errors can contain sensitive information
  // so the error message and stack trace is not exposed to users
  // and shows a more generic error message { message: "Internal error" }
  throw new Error('Yikes! 🤫')

  // expected errors are created using the `error` helper
  // which sets the status and renders a `+error.svelte` component
  // and returns the status and error message
  error(404, { message: 'Yikes! 📢' })
}
Don’t worry about what the +page.ts file does right now but notice how if you define a +error.svelte file inside a route SvelteKit is going to use the closest error boundary when something explodes.
<script lang="ts">
  import { page } from '$app/stores'
</script>

<h1>Yikes! 💥</h1>

<p>Something went horribly wrong but the blast radius has been contained to this route.</p>

<pre>
  {JSON.stringify($page, null, 2)}
</pre>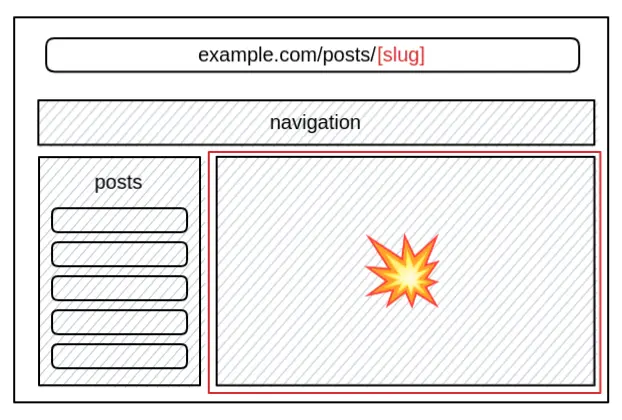
Because the error is unexpected SvelteKit is going to hide the stack trace to not reveal potential sensitive information.
Talk about an explosion! 🤯
Dynamic Routes
If you had a lot of posts It would be tedious to create a route with a slug for every post like /posts/one/+page.svelte, /posts/two/+page.svelte and so on.
To avoid that you can create a route with dynamic parameters using square brackets around a variable name.
For example src/routes/posts/[slug]/+page.svelte creates a route that matches /posts/one and /posts/two or anything else like /posts/banana.
<script lang="ts">
  import { page } from '$app/stores'
</script>

<h1>Post</h1>

<pre>
  {JSON.stringify($page, null, 2)}
</pre>
I’m using the page store from SvelteKit to output the page params to see the slug for each page.
Right now if you navigate to any post the content is going to be the same but later when we get to loading data I’m going to show you how to use the dynamic parameter to show a post.
Multiple Route Parameters
You can use multiple parameters as long as they are separated by at least one character like src/routes/image/[width]x[height]/+page.svelte where [width] and [height] are dynamic parameters.
<script lang="ts">
  import { page } from '$app/stores'
</script>

<h1>Dimensions</h1>

<pre>
  {JSON.stringify($page, null, 2)}
</pre>
Optional Parameters
Let’s say you’re working on internalization and you have a [lang]/about route with a required [lang] parameter.
You might make want to make [lang] optional, so that en/about and /about point to the same page using the default language.
To do this you can wrap the [lang] parameter in another bracket pair [[lang]]/about.
<h1>About</h1>Note that this a simplified example because we haven’t learned about some things yet to make changing the language work but at least you know about optional parameters in case you need it.
Rest Parameters
You might receive an unknown number of path segments in case which you can use a [...rest] parameter but be careful you do checks in your code because it could be anything.
Let’s take a contrived example where I have an image API that takes a path to an image and dimensions you want such as media/[...file]/[width]/[height].
<script lang="ts">
  import { page } from '$app/stores'
</script>

<h1>Rest parameters</h1>

<pre>
  {JSON.stringify($page, null, 2)}
</pre>
Going to /media/path/to/image/200/200 makes the following parameters available to the page.
{
  "file": "path/to/image",
  "width": "200",
  "height": "200"
}
Matching Parameters
If you go to the post route /posts/[slug] right now it matches whatever but you might want to be more strict and make sure the route matches a valid slug.
You can do that using matching parameters by creating a src/params directory and create a new file that exports a match function.
🐿️ If you have trouble with regular expressions don’t fret because ChatGPT makes it easy by giving it a prompt like “Can you write a
matchfunction in JavaScript that just checks ifparamis a slug?”.
export function match(param) {
  return /^[a-z0-9-]+$/.test(param)
}
Alright, sweet!
The match function is going to check if the slug contains only lowercase letters, numbers, and hyphens.
To use the new matcher rename src/routes/posts/[slug] to src/routes/posts/[slug=slug].
If the route doesn’t match SvelteKit returns a 404.
That’s everything you need to know when it comes to routing in SvelteKit! There’s more advanced things to go over like group layouts but first we need to learn about data loading in SvelteKit.
In the next part you’re going to learn how to create API endpoints and load data for pages in SvelteKit.