Make A Typing Game With Svelte
Published Oct 21, 2022
Table of Contents
- Typing Game
- Setup
- Let’s Think About The Problem
- Words And Letters
- Updating The Line
- Adding The Caret
- Game Timer
- Game Over
- Making Our Words API
- Game Reset
- Finishing Touches
- Next Steps
Typing Game
By the end of this post you’re going to make a typing game that measures your typing speed similar to Monkeytype.
Setup
I’m going to start a new SvelteKit project with TypeScript (optional) and Sass (optional) for styling.
🧪 The project files are available on GitHub and you can try it on StackBlitz.
# initialize SvelteKit project
npm create svelte

# install dependencies
npm i

# install Sass
npm i -D sass

# run development server
npm run dev
Let’s start by adding some global styles.
@import url('https://fonts.googleapis.com/css2?family=Lexend+Deca&display=swap');
@import url('https://fonts.googleapis.com/css2?family=Roboto+Mono&display=swap');

*,
*::before,
*::after {
  margin: 0;
  padding: 0;
  box-sizing: border-box;
}

:root {
  --primary: tomato;
  --fg-100: hsl(220 20% 98%);
  --fg-200: hsl(220 20% 80%);
  --bg-100: hsl(220 20% 14%);
}

html,
body,
#app {
  height: 100%;
}

body {
  font-family: 'Roboto Mono', monospace;
  color: var(--fg-100);
  background-color: var(--bg-100);
}

button {
  font: inherit;
  color: inherit;
  background: none;
  border: none;
  opacity: 0.4;
  transition: all 0.3s ease;

  &:hover {
    cursor: pointer;
    opacity: 1;
  }
}
Make sure you add the #app id to the <div> inside app.html to inherit the height.
<!DOCTYPE html>
<html lang="en">
  <head>
    <meta charset="utf-8" />
    <meta name="viewport" content="width=device-width" />
    <link rel="icon" href="%sveltekit.assets%/favicon.png" />
    <link rel="icon" href="https://fav.farm/🔥" />
    %sveltekit.head%
  </head>
  <body>
    <div id="app">%sveltekit.body%</div>
  </body>
</html>
Second let’s add a layout file to import the styles and define a layout.
<script lang="ts">
  import '../styles/app.scss'
</script>

<svelte:head>
  <title>Sveltype</title>
</svelte:head>

<div class="layout">
  <nav>
    <h1>🔥 sveltype</h1>
  </nav>

  <main>
    <slot />
  </main>
</div>

<style lang="scss">
  h1 {
    font-family: 'Lexend Deca', sans-serif;
    font-size: 1.8rem;
    color: var(--fg-200);
    letter-spacing: 2px;
  }

  .layout {
    height: 100%;
    display: grid;
    grid-template-rows: auto 1fr;
    align-items: center;
    padding: 2rem;
  }
</style>
The rest of the post is going to be inside +page.svelte so you can clear it out and add a <style> tag.
<style lang="scss">
  /* ... */
<style>
That’s it for the setup!
Let’s Think About The Problem
Before making the mistake of going straight to code let’s think about the problem we’re trying to solve first.
I encourage you to inspect Monkeytype and see what you can find out about how it works — does it work how you thought?
Problem solving in coding is similar to math where you need to figure out what information you know to solve a problem.
After thinking about it the variables required to solve the problem are the typed letter and the current word and letter.
I always find it helpful to think about how to “drive” state using a data structure and update the user interface based on some logic.
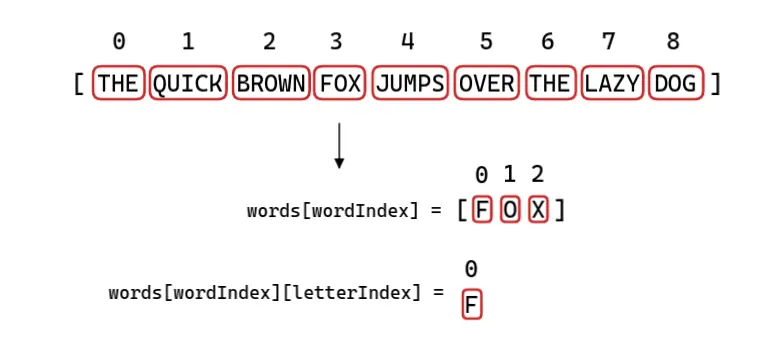
Given the sentence “The quick brown fox jumps over a lazy dog” you can turn it into an array ['The', 'quick', 'brown', 'fox', '...'] using the split method.
To get the current word you can use an index words[wordIndex] to access the value of the array where words[3] returns "Fox" and use an index again words[wordIndex][letterIndex] where words[3][0] returns the letter "F".
Once you understand the logic you’re done with the hard part and now you have to find a way to do it using code.
If you keep track of that state you can solve the problem by comparing the current letter to the letter the player typed typedLetter === currentLetter and based on that set a class or whatever on the current letter element.
This is going to make more sense when you see it!
I want to stress the importance of thinking about solving the problem yourself because that’s how you improve.
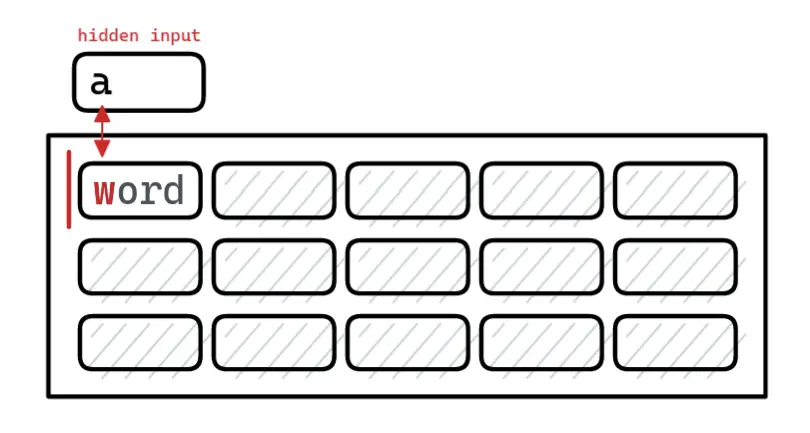
Words And Letters
Our game is going to have three states which I’m going to express as explicit state waiting for input, in progress and game over to avoid impossible states using booleans.
🐿️ Using booleans it’s easy to get into impossible states. For example
let gameStarted = falsehas two possible values whenlet game = 'started'can only have one value.
For now let’s start simple until we have the logic working and later we’re going to replace the placeholder words with our own word API.
<script lang="ts">
  type Game = 'waiting for input' | 'in progress' | 'game over'
  type Word = string

  let game: Game = 'waiting for input'
  let typedLetter = ''

  let words: Word[] = "The quick brown fox jumps over the lazy dog".split(' ')
  let wordIndex = 0
  let letterIndex = 0
  let correctLetters = 0

  let wordsEl: HTMLDivElement
  let letterEl: HTMLSpanElement
  let inputEl: HTMLInputElement

  function updateGameState() {
    // ...
  }

  function handleKeydown(event: KeyboardEvent) {
    // ...
  }
</script>

<div class="game" data-game={game}>
  <input
    bind:this={inputEl}
    bind:value={typedLetter}
    on:input={updateGameState}
    on:keydown={handleKeydown}
    class="input"
    type="text"
  />

  <div bind:this={wordsEl} class="words">
    {#each words as word}
      <span class="word">
        {#each word as letter}
          <span class="letter">{letter}</span>
        {/each}
      </span>
    {/each}
  </div>
</div>
The reason we bind this for the input is so we can focus the input and words to get the element reference to the word and the current letter.
I’m using an input listener to update game state but you could also use a reactive value in Svelte like $: typedLetter, updateGameState() that’s going to run the function when the value is updated.
The keydown event is used to detect player input to start the game and when the player presses space to move to the next word.
I love to use data attributes to apply styles based on state data-game={game} which is simpler than having to do some boolean logic inside your code later.
Let’s start with handleKeydown.
<script lang="ts">
  function handleKeydown(event: KeyboardEvent) {
    if (event.code === 'Space') {
      event.preventDefault()
    }

    if (game === 'waiting for input') {
      startGame()
    }
  }

  // ...
</script>
I want to prevent the default behaviour when the player presses Space because we need it for the game and start the game if they press a key.
The startGame should update the game state and I’m going to create a setGameState function to set it just because it’s nicer to use.
<script lang="ts">
  function startGame() {
    setGameState('in progress')
  }

  function setGameState(state: Game) {
    game = state
  }

  // ...
</script>
Thanks to TypeScript we get great autocomplete.
Each time the player inputs a letter it’s going to run updateGameState that should:
- set a reference to the letter element
- check if the typed letter is correct
- go to the next letter
- clear the input because I only want to compare the current letter
<script lang="ts">
  function updateGameState() {
    setLetter()
    checkLetter()
    nextLetter()
    resetLetter()
  }

  // ...
</script>
Before I set the letter I want to check if the word is done by checking if the letterIndex is higher than the length of the word.
<script lang="ts">
  function setLetter() {
    const isWordCompleted = letterIndex > words[wordIndex].length - 1

    if (!isWordCompleted) {
      letterEl = wordsEl.children[wordIndex].children[
        letterIndex
      ] as HTMLSpanElement
    }
  }

  // ...
</script>
This is why I wanted the reference to the words element because using the children method it’s easy to either get the word element or the letter element.
I’m going to compare the typed letter to the current letter. You can get the letter from the words array or wordsEl using innerText on the letter element.
If the typed letter equals the current letter I’m going to increase the score and set a data attribute data-letter='correct' on the <span> element for styling.
<script lang="ts">
  function checkLetter() {
    const currentLetter = words[wordIndex][letterIndex]

    if (typedLetter === currentLetter) {
      letterEl.dataset.letter = 'correct'
      increaseScore()
    }

    if (typedLetter !== currentLetter) {
      letterEl.dataset.letter = 'incorrect'
    }
  }

  function increaseScore() {
    correctLetters += 1
  }

  // ...
</script>
Also we need to set the next letter and reset the input.
<script lang="ts">
  function nextLetter() {
    letterIndex += 1
  }

  function resetLetter() {
    typedLetter = ''
  }

  // ...
</script>
If you inspect the letters inside the word element you can see the data attribute is applied correctly but we have to add the styles.
The simplest solution I found to having a specific number of lines is multiplying the line-height with the number of lines you want offset by some value for extra padding.
The use of :global for the data attributes is required because Svelte removes unused classes if they’re not used in the template and it doesn’t know they exist.
<!-- ... -->

<style lang="scss">
  .words {
    --line-height: 1em;
    --lines: 3;

    width: 100%;
    max-height: calc(var(--line-height) * var(--lines) * 1.42);
    display: flex;
    flex-wrap: wrap;
    gap: 0.6em;
    position: relative;
    font-size: 1.5rem;
    line-height: var(--line-height);
    overflow: hidden;
    user-select: none;

    .letter {
      opacity: 0.4;
      transition: all 0.3s ease;

      &:global([data-letter='correct']) {
        opacity: 0.8;
      }

      &:global([data-letter='incorrect']) {
        color: var(--primary);
        opacity: 1;
      }
    }
  }
</style>
I love the subtle but beautiful transition for the color and opacity which you can tweak to your liking.
To go to the next word you need to increment wordIndex and reset the letterIndex. Pressing Space to go to the next word also counts towards the words per minute score.
The player could skip words on accident, so I want to make sure it doesn’t happen on the first letter and also take into consideration if it’s a one-letter word.
Thanks to using explicit state I can make sure this only happens when the game is in progress.
<script lang="ts">
  function nextWord() {
    const isNotFirstLetter = letterIndex !== 0
    const isOneLetterWord = words[wordIndex].length === 1

    if (isNotFirstLetter || isOneLetterWord) {
      wordIndex += 1
      letterIndex = 0
      increaseScore()
    }
  }

// ...

function handleKeydown(event: KeyboardEvent) {
  if (event.code === 'Space') {
    event.preventDefault()

    if (game === 'in progress') {
      nextWord()
    }
  }

  // ...
}
</script>
Updating The Line
As you type and pass the middle line the old line should go up.
The simplest way I found to do that is taking the Y position of the words container and checking if the current word’s Y position is greater.
To get the measurements I’m using getBoundingClientRect which gives you the size and position of an element relative to the viewport and is useful for many things.
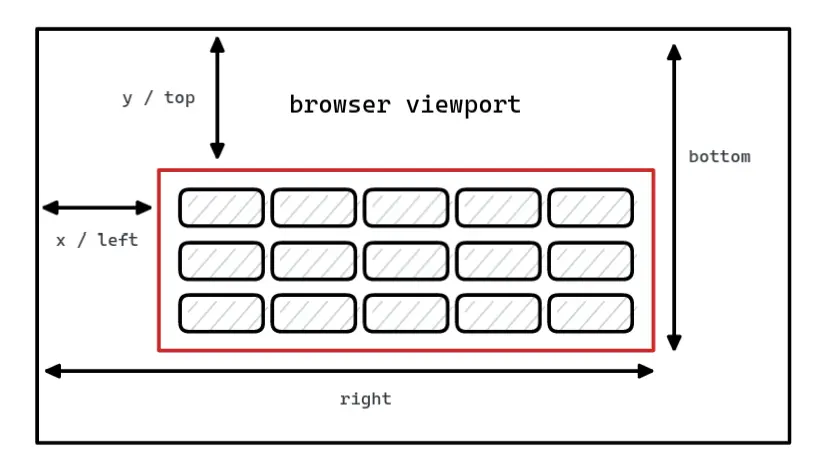
We’re going to get a reference to the current word wordEl, the Y position for words wordsY and the Y position for the current word wordY.
If wordY > wordsY we can use the handy scrollIntoView method and pass it an argument for vertical alignment.
<script lang="ts">
  function updateGameState() {
    // ...
    updateLine()
  }

  // ...

  function updateLine() {
    const wordEl = wordsEl.children[wordIndex]
    const wordsY = wordsEl.getBoundingClientRect().y
    const wordY = wordEl.getBoundingClientRect().y

    if (wordY > wordsY) {
      wordEl.scrollIntoView({ block: 'center' })
    }
  }
</script>
This is a great achievement for someone mathematically challenged as I am. 🤭
Adding The Caret
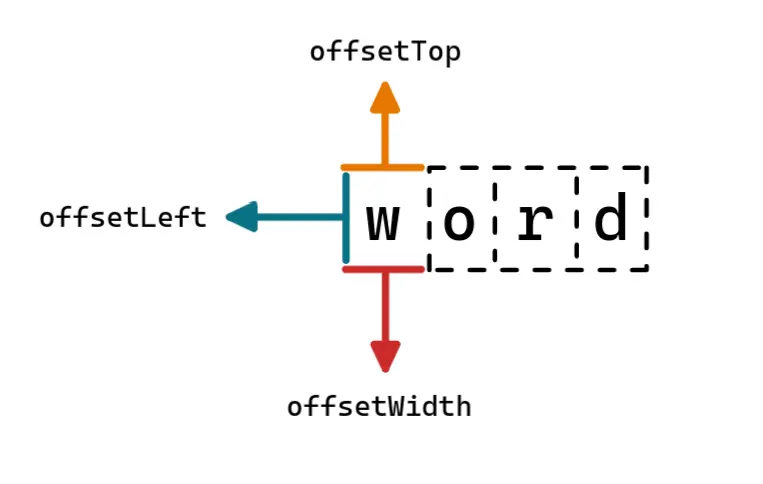
Let’s create the caret! I know what you’re thinking and it’s not a 🥕 you silly 🐇. Caret is another word for cursor.
I’m going to add the caret element inside the words element and absolutely position it and show you how to make a blinking cursor animation.
I already have the reference to the letter from letterEl and it has some useful properties such as offsetTop, offsetLeft and offsetWidth you can use to move the caret.
Moving the caret is going to be simple as updating the top and left position.
Don’t forget to invoke moveCaret when updating the game state and going to the next word.
<script lang="ts">
  let caretEl: HTMLDivElement

  function updateGameState() {
    // ...
    moveCaret()
  }

  // ...

  function nextWord() {
    // ...

    if (isNotFirstLetter || isOneLetterWord) {
      // ...
      moveCaret()
    }
  }

  // ...

  function moveCaret() {
    const offset = 4
    caretEl.style.top = `${letterEl.offsetTop + offset}px`
    caretEl.style.left = `${letterEl.offsetLeft + letterEl.offsetWidth}px`
  }
</script>

<div bind:this={wordsEl} class="words">
  <!-- ... -->

  <div bind:this={caretEl} class="caret" />
</div>

<style lang="scss">
  .words {
    .game {
      &[data-game='in progress'] .caret {
        animation: none;
      }
    }

    .caret {
      position: absolute;
      height: 1.8rem;
      top: 0;
      border-right: 1px solid var(--primary);
      animation: caret 1s infinite;
      transition: all 0.2s ease;

      @keyframes caret {
        0%,
        to {
          opacity: 0;
        }
        50% {
          opacity: 1;
        }
      }
    }
  }
</style>
Enjoy your blinking 🥕.
Game Timer
To uphold a healthy keyboard environment I’m going to make a game last 30 seconds which is also reflected in the words per minute equation.
Remember the startGame function way back? I’ll meet you there for a secret rendezvous.
<script lang="ts">
  let seconds = 30

  // ...

  function startGame() {
    // ...
    setGameTimer()
  }

  function setGameTimer() {
    function gameTimer() {
      if (seconds > 0) {
        seconds -= 1
      }

      if (game === 'waiting for input' || seconds === 0) {
        clearInterval(interval)
      }

      if (seconds === 0) {
        setGameState('game over')
        getResults()
      }
    }

    const interval = setInterval(gameTimer, 1000)
  }

  // ...
</script>

<div class="game" data-game={game}>
  <input
    bind:this={inputEl}
    bind:value={typedLetter}
    on:input={updateGameState}
    on:keydown={handleKeydown}
    class="input"
    type="text"
  />

  <div class="time">{seconds}</div>

  <!-- ... -->
</div>

<style lang="scss">
  .game {
    position: relative;

    .time {
      position: absolute;
      top: -48px;
      font-size: 1.5rem;
      color: var(--primary);
      opacity: 0;
      transition: all 0.3s ease;
    }

    &[data-game='in progress'] .time {
      opacity: 1;
    }
  }
</style>
I set up the next section here after the game is over where it gets the result to display to the player.
Game Over
When the game timer runs out the game state is updated and getResults is invoked.
I’m going to define wordsPerMinute and accuracy using a tweened Svelte store to interpolate the numbers for a nice animation.
To get the words per minute I use an equation that considers five letters as a word because longer words should have a higher value and then divide it by 0.5 minutes since the game timer is 30 seconds.
The accuracy equation is simple as taking the amount of correct letters and diving it by total letters to get the percentage.
To get the total amount of letters I use reduce to get the total value by going over each word and adding words.length to count.
<script lang="ts">
  import { tweened } from 'svelte/motion'

  // ...

  let wordsPerMinute = tweened(0, { delay: 300, duration: 1000 })
  let accuracy = tweened(0, { delay: 1300, duration: 1000 })

  // https://www.speedtypingonline.com/typing-equations
  // words per minute = (correct / 5) / time
  // accuracy = (correct / total) * 100%

  function getWordsPerMinute() {
    const word = 5
    const minutes = 0.5
    return Math.floor(correctLetters / word / minutes)
  }

  function getResults() {
    $wordsPerMinute = getWordsPerMinute()
    $accuracy = getAccuracy()
  }

  function getAccuracy() {
    const totalLetters = getTotalLetters(words)
    return Math.floor((correctLetters / totalLetters) * 100)
  }

  function getTotalLetters(words: Word[]) {
    return words.reduce((count, word) => count + word.length, 0)
  }
</script>

{#if game !== 'game over'}
  <div class="game" data-game={game}>
    <!-- ... -->
  </div>
{/if}

{#if game === 'game over'}
  <div class="results">
    <div>
      <p class="title">wpm</p>
      <p class="score">{Math.trunc($wordsPerMinute)}</p>
    </div>

    <div>
      <p class="title">accuracy</p>
      <p class="score">{Math.trunc($accuracy)}%</p>
    </div>
  </div>
{/if}

<style lang="scss">
  .results {
    .title {
      font-size: 2rem;
      color: var(--fg-200);
    }

    .score {
      font-size: 4rem;
      color: var(--primary);
    }

    .play {
      margin-top: 1rem;
    }
  }
</style>
Your keyboard can find respite from the abuse. 😅
Making Our Words API
I want to create an API /api/words?limit=100 to get a list of random English words from the server.
I’m going to take a JSON file of 1000 common English words I yoinked and create a standalone endpoint in SvelteKit to get randomized words based on a limit.
🐿️ You could also pass the data directly to the page in SvelteKit from the server by creating a
+page.tsendpoint for the page itself and receive it fromexport let data.
Inside routes I’m going to create an api folder I made up because it’s not a convention and you can copy the English words inside routes/api/words/languages/english.json.
I’m going to import the JSON file inside the SvelteKit endpoint and randomize the words before I return them as a JSON response.
import { json } from '@sveltejs/kit'
import type { RequestHandler } from './$types'

import english from './languages/english.json'

export const GET: RequestHandler = ({ url }) => {
  const limit = Number(url.searchParams.get('limit'))
  const words = english.words.slice(0, limit).sort(() => 0.5 - Math.random())
  return json(words)
}
Let’s use our new power and replace the placeholder text. You need to do it when the page loads though inside onMount.
<script lang="ts">
  import { onMount } from 'svelte'

  let words: Word[] = []

  // ...

  async function getWords(limit: number) {
    const response = await fetch(`/api/words?limit=${limit}`)
    words = await response.json()
  }

  onMount(async () => {
    getWords(100)
  })
</script>
I do love the simplicity of SvelteKit.
It blurs the line between frontend and backend as you just wrote backend code and created an endpoint — I guess you’re a fullstack developer now! 🥳
Game Reset
I want to give the player a way to reset the game if they don’t like the words or want to play again.
I’m also going to include a toggleReset so you can use a {#key ...} block to play a transition when it happens.
<script lang="ts">
  import { blur } from 'svelte/transition'

  let toggleReset = false

  // ...

  function resetGame() {
    toggleReset = !toggleReset

    setGameState('waiting for input')
    getWords(100)

    seconds = 30
    typedLetter = ''
    wordIndex = 0
    letterIndex = 0
    correctLetters = 0

    $wordsPerMinute = 0
    $accuracy = 0
  }
</script>

{#if game !== 'game over'}
  <div class="game" data-game={game}>
    <!-- ... -->

    {#key toggleReset}
      <div in:blur|local bind:this={wordsEl} class="words">
        <!-- ... -->
      </div>
    {/key}

    <div class="reset">
      <button on:click={resetGame} aria-label="reset">
        <svg
          xmlns="http://www.w3.org/2000/svg"
          viewBox="0 0 24 24"
          width="24"
          height="24"
          stroke-width="1.5"
          stroke="currentColor"
          fill="none"
        >
          <path
            stroke-linecap="round"
            stroke-linejoin="round"
            d="M15 15l6-6m0 0l-6-6m6 6H9a6 6 0 000 12h3"
          />
        </svg>
      </button>
    </div>

  </div>
{/if}

{#if game === 'game over'}
  <div in:blur class="results">
    <!-- ... -->

    <button on:click={resetGame} class="play">play again</button>
  </div>
{/if}

<style lang="scss">
  .game {
    /* ... */

    .reset {
      width: 100%;
      display: grid;
      justify-content: center;
      margin-top: 2rem;
    }
  }
</style>
I use a local transition on words in:blur|local to prevent the transition from playing when the parent is added or removed.
You can learn everything I know about animation with Svelte in the post I wrote.
Finishing Touches
I’m going to hide the input since you no longer need it and I want to focus the input when the page loads.
<script lang="ts">
  // ...

  function focusInput() {
    inputEl.focus()
  }

  onMount(async () => {
    // ...
    focusInput()
  })
</script>

<style lang="scss">
  .game {
    .input {
      position: absolute;
      opacity: 0;
    }

    /* ... */
  }
</style>
That’s it! 🎉
Next Steps
I encourage you to take what you learned and improve it because there’s probably some bugs. 🐞
I would be happy to see your improvements or what you learned at @joyofcodedev.
Here’s some ideas:
- Break the code into components (you can use Svelte component events and I wrote a Svelte state management guide if you need help)
- The input can lose focus if you press a random key, so make sure you keep track of the focus and improve that experience for the player
- You can start a game on accident by pressing any key but you could use regex to make sure the input is a letter
- Figure out how to edit previous letters for the current word by listening for the
Backspacekey and changingletterIndex - The caret should animate when it moves to the next word and you can fix it by adding a space between words which would count towards the score, so you could remove the
Spacecode - If you need more ideas have a look at Monkeytype where you can get inspired like implementing a replay feature (what?! 😄)
Hope you learned a lot because I surely have and despite not having a lot of experience making games I learned it can teach you a lot about problem solving and coding concepts in general.
Thank you for reading! 🏄️