Svelte State Management Guide
Published Aug 22, 2022
Table of Contents
- Introduction
- Component Props
- Bindings
- Component Events
- Svelte Stores
- The Context API
- Module Context
- The URL
- Summary
Introduction
The aim of this post is to give you tools to manage complexity in your app and learn how to manage state in Svelte and ways you can communicate between components.
You’re going to learn about props, bindings, component events, stores, context and when you might use them instead of being a prescription.
You can find the examples on GitHub and try them out on StackBlitz.
Component Props
By default the data in your app flows down from parent to child component like a river.
You can co-locate or lift state up to the parent component that’s going to pass the props to children.
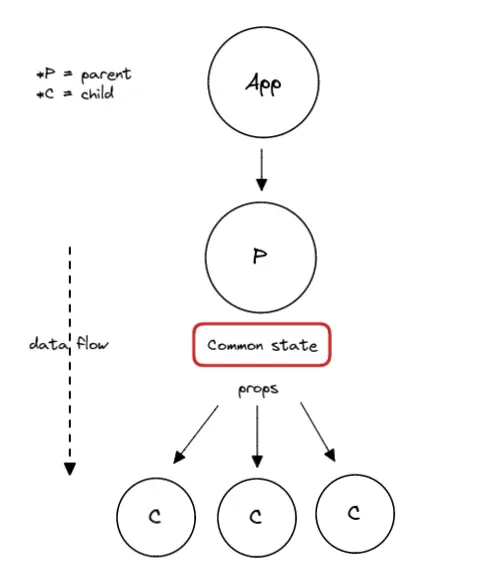
The next example uses a parent <Counter> component to pass the count, increment and decrement props down to its children.
The common state is lifted up to the parent component.
<script lang="ts">
  import Count from './count.svelte'
  import Increment from './increment.svelte'
  import Decrement from './decrement.svelte'

  let count = 0

  const increment = () => count += 1
  const decrement = () => count -= 1
</script>

<div class="counter">
  <Increment {increment} />
  <Count {count} />
  <Decrement {decrement} />
</div>
The props are received by the children.
<script lang="ts">
  export let count: number
</script>

<p>{count}</p><script lang="ts">
export let increment: () => void
</script>
<button on:click={increment}>+</button><script lang="ts">
export let decrement: () => void
</script>
<button on:click={decrement}>-</button>🐿️ The
{prop}syntax is shorthand forprop={prop}.
This is a contrived example and you should only split your code into components when it becomes hard to manage because hasty abstractions can shoot you in the foot.
There’s nothing to write home about in this example if you ever used a declarative JavaScript framework in the past but if you haven’t let it sink in and try it out.
If TypeScript spooks you, it’s optional! 😄
Bindings
If you had to pass input from one component to another and update it when it changes your code might look like this.
<script lang="ts">
  import Input from './input.svelte'
  import Output from './output.svelte'

  let input = ''
</script>

<Input updateInput={(event) => input = event.target.value} />
<Output {input} />
I’ve mentioned how data flows down but using the bind:property directive we can also let it flow the other way.
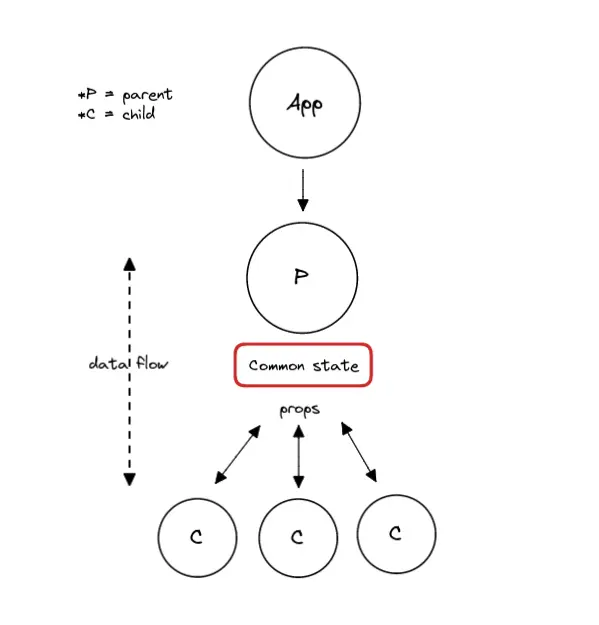
In Svelte you can bind values to properties of DOM elements but also to component props meaning your child component can talk to the parent component.
<script lang="ts">
  import Input from './input.svelte'
  import Output from './output.svelte'

  let input = ''
</script>

<Input bind:input />
<Output {input} />
To bind the prop we can export it from the component and bind it to the input.
<script lang="ts">
  export let input: string
</script>

<input type="text" bind:value={input} />
The output is going to update after a change.
<script lang="ts">
  export let input: string
</script>

<p>{input}</p>
With great power comes great responsibility so be careful to not abuse bind because it’s going to be hard to keep track of your state and what changes it the more you pass it around.
Component Events
Component events are another way to send data upstream based on the CustomEvent API.
You can try out the example anywhere where you can run JavaScript like the console in your developer tools! 😄
const message = new CustomEvent('message', { detail: 'Hello 👋' })

addEventListener('message', (event) => alert(event.detail))

dispatchEvent(message)
In Svelte you dispatch the custom event from a child component and listen for it in the parent component.
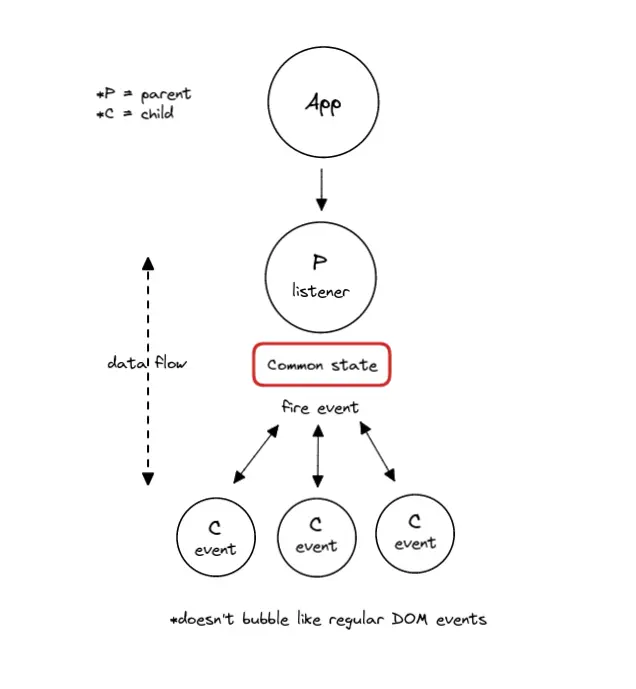
I want to track the x and y mouse coordinates when the user moves the mouse and on the <Mouse> component I’m listening for an updatePosition event.
 <script lang="ts">
  import Mouse from './mouse.svelte'

  let x = 0
  let y = 0

  function updatePosition(event: CustomEvent<MouseEvent>) {
    const target = event.detail.target as HTMLDivElement
    const element = target.getBoundingClientRect()

    // we only want to measure x, y inside the element
    x = event.detail.clientX - element.left
    y = event.detail.clientY - element.top
  }
</script>

<Mouse on:updatePosition={updatePosition} />

<div>
  x: {x}, y: {y}
</div>
Inside the child component is where you dispatch the event.
<script lang="ts">
  import { createEventDispatcher } from 'svelte'

  const dispatch = createEventDispatcher()

  function handleMouseMove(event: MouseEvent) {
    dispatch('updatePosition', event)
  }
</script>

<div class="mousearea" on:mousemove={handleMouseMove} />
Component events are awesome but they don’t bubble like regular DOM events, so you have to forward them but you can do whatever you want like having on:submit on your <Form> component.
🐿️ In Svelte you can also forward DOM events for example if you have a component like
<Button on:click={handleClick} />then inside the component you can forward the event with<button on:click>Click</button>.
Svelte Stores
Stores are just objects you can subscribe to and be notified whenever the store value changes and they’re great if you have global state as sometimes you have values that need to be accessed by multiple unrelated components.
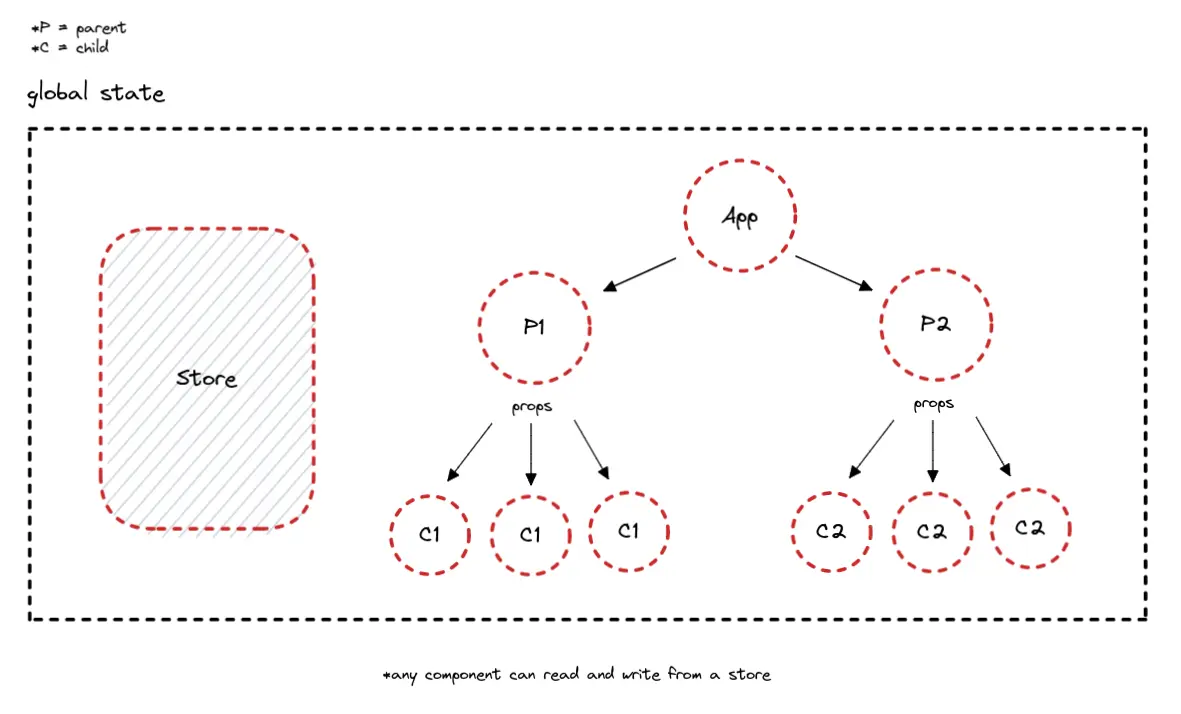
Lets start with the most basic example and then I’m excited to show you how simple it is to make a toast notification system.
<script lang="ts">
  // you can "store" it inside a file 🥁
  import { writable } from 'svelte/store'

  const count = writable(0)
</script>

<button on:click={() => $count += 1}>
  {$count}
</button>
🐿️ The
$countsyntax is a Svelte convenience that subscribes and unsubscribes to the store saving you from writing extra code.
You would use a file like store.ts to export the store value count from and now when you update it wherever you’re using count gets updated.
Let’s create a simple toast notification store!
The toast method is going to update the notifications and the removeToast method is going to remove the last notification using after 2 seconds.
import { writable } from 'svelte/store'

type Notification = string

export const notifications = writable<Notification[]>([])

export function toast(message: string) {
  notifications.update((state) => [message, ...state])
  setTimeout(removeToast, 2000)
}

function removeToast() {
  notifications.update((state) => {
    return [...state.slice(0, state.length - 1)]
  })
}
The convenient $notifications syntax doesn’t work outside Svelte components, so we have to use the update method from the store.
The <Toast> component is responsible for showing the notifications.
<script lang="ts">
  import { fade } from 'svelte/transition'
  import { notifications } from './notifications'
</script>

{#if $notifications}
  <div class="notifications">
    {#each $notifications as notification}
      <div
        role="alert"
        class="notification"
        transition:fade
      >
        {notification}
      </div>
    {/each}
  </div>
{/if}
We just need to import the <Toast> component and the toast method from the store to trigger a notification.
<script lang="ts">
  import Toast from './toast.svelte'
  import { toast } from './notifications'
</script>

<Toast />

<button on:click={() => toast('🔥 Svelte is fire')}>
  Show notification
</button>
You can extend it further and provide some configuration options like a notification type and duration before it disappears.
⚠️ Be careful if you have a large store because if you update a value it’s going to update everything else that might not be related to it, so it’s a great to have separate stores or derive the value from the store using derived stores.
This just scratches the surface what you can do with Svelte stores but I hope you understand when you would use it.
The Context API
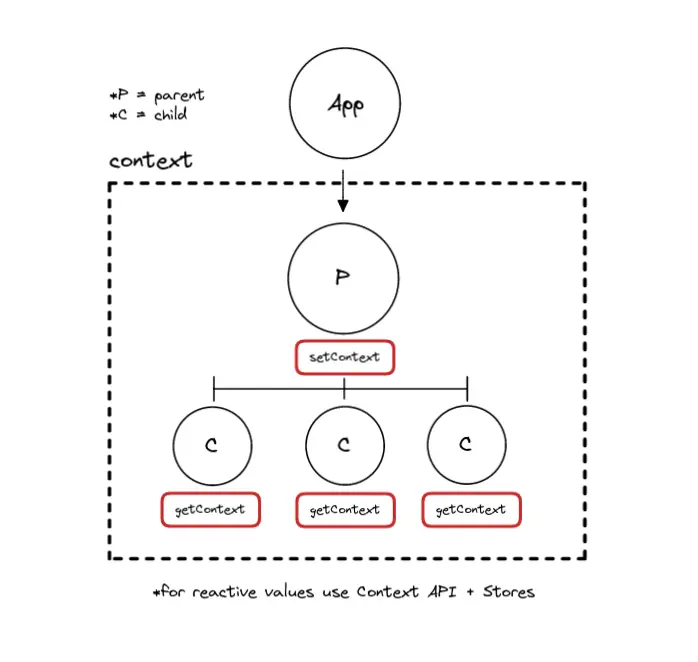
The Context API is useful when you have nested components that share state to avoid passing the same props around also known as prop drilling but also sharing logic.
Let’s say I want to use the Canvas API in a more declarative way.
<Canvas width={600} height={400}>
  <Circle x={300} y={200} radius={40} ... />
</Canvas>
It’s way nicer than doing this!
const canvas = document.querySelector('canvas')
const ctx = canvas.getContext('2d')

ctx.beginPath()
ctx.fillStyle = 'aquamarine'
ctx.arc(300, 200, 40, 0, 2 * Math.PI)
ctx.fill()
I’m happy with the API and I go implement it but there’s one problem and it’s passing the reference to the <canvas> element around which is tedious. 😮💨
<Canvas {canvas}>
  <Circle {canvas} />
</Canvas>
This is where the Context API can help us because instead of passing the reference around we can define the context inside the parent <Canvas> component and the children components like <Circle> can access the context.
Inside the parent we import the components.
<script lang="ts">
  import Canvas from './canvas.svelte'
  import Circle from './circle.svelte'

  let width = 600
  let height = 400
</script>

<Canvas {width} {height}>
  <Circle
    x={width / 2}
    y={height / 2}
    radius={40}
    startAngle={0}
    endAngle={2 * Math.PI}
    color="aquamarine"
  />
</Canvas>
Inside the <Canvas> component I use setContext with a key canvas to access it later and I defined a getCanvas method to get the reference to the canvas element.
<script lang="ts">
  import { setContext } from 'svelte'

  setContext('canvas', {
    getCanvas: () => canvas,
  })

  export let width: number
  export let height: number

  let canvas: HTMLCanvasElement
</script>

<canvas bind:this={canvas} {width} {height} />

<slot />
To get the reference to the canvas element I use getContext using the key from before and now I have a reference to the canvas.
<script lang="ts">
  import { getContext, onMount } from 'svelte'

  const { getCanvas } = getContext('canvas')

  export let x: number
  export let y: number
  export let radius: number
  export let startAngle: number
  export let endAngle: number
  export let color: string

  onMount(() => {
    const canvas: HTMLCanvasElement = getCanvas()
    const ctx = canvas.getContext('2d')
    if (!ctx) return

    ctx.beginPath()
    ctx.fillStyle = color
    ctx.arc(x, y, radius, startAngle, endAngle)
    ctx.fill()
  })
</script>
That’s it! 😄
If you need reactive values you can pass a store to context, so it’s only available to that component and it’s descendants.
<script lang="ts">
  import { setContext } from 'svelte'
  import { writable } from 'svelte/store'

  const value = writable(0)

  // the value is now reactive
  setContext('key', value)
</script>
The Context API is powerful but don’t treat it as a solution for everything and use other methods like props, bindings and events until you need it.
Module Context
Before I confuse you this has nothing to do with the Context API but refers to <script context="module"> in your Svelte component.
Module context is useful when you want to share state between multiple component instances.
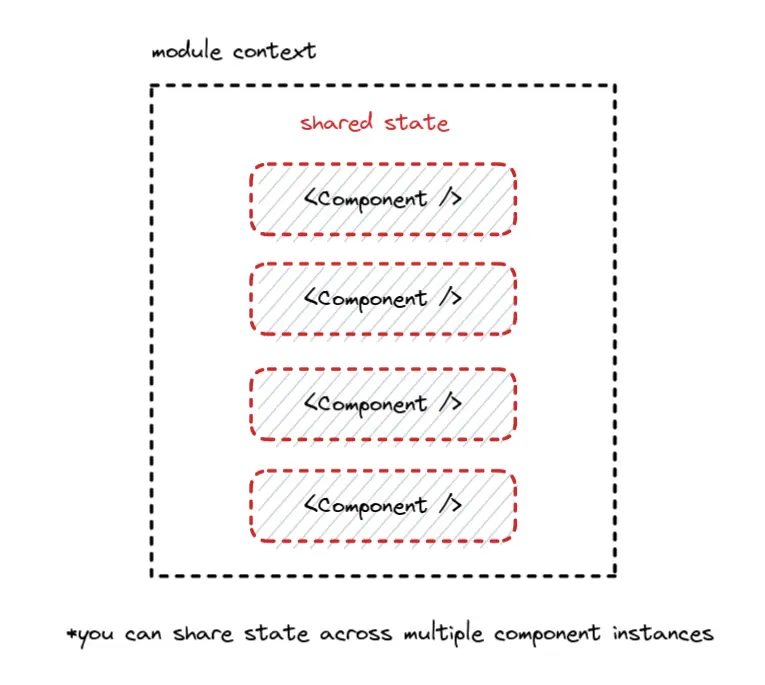
It might seem magical but it’s how JavaScript works! 🪄
// this file is a module

console.log('context module')

export class Component {
  constructor() {
    console.log('component')
  }
}import { Component } from './Component.js'
// logs "context module" once
const component1 = new Component() // logs "component"
const component2 = new Component() // logs "component" again🐿️ This is how it works in Svelte because your components get turned into classes at the end of the day.
Let’s say you run some banana processing plants and each time you add or remove a banana you want that data to be shared among the processing plants.
Because we’re inside a module context the value isn’t going to be reactive but we can use a store.
<script context="module" lang="ts">
  import { writable } from 'svelte/store'

  export let bananas = writable<string[]>([])
</script>

<script lang="ts">
  function addBanana() {
    $bananas = [...$bananas, '🍌']
  }

  function removeBanana() {
    $bananas = [...$bananas.slice(0, $bananas.length - 1)]
  }
</script>

<h3>Component</h3>

<div class="production">
  <button on:click={addBanana}> +🍌</button>
  <button on:click={removeBanana}> -🍌</button>
</div>
Regardless from what processing plant you add or remove the banana it’s going to update the produce.
import Production, { banana } from './production.svelte'

<Production />
<Production />

{#if $bananas.length}
  <div class="produce">{$bananas.join('')}</div>
{/if}
I never use it but it’s good to aware of it if you need it.
The URL
What was the first state manager?
You might not expect it but it’s the URL and you can use it for things like coupon codes or referral links but you could also use it to preserve some state over a link.
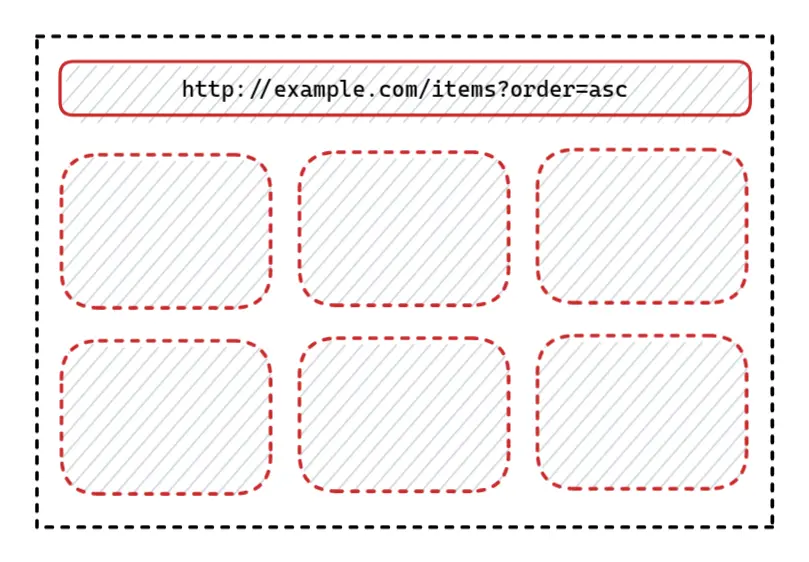
Let’s pretend you have some list sorted by ascending order but want to link it to someone else sorted by descending order.
Using SvelteKit you can get the parsed query string of the URL from the $page store over $page.url.searchParams and if it doesn’t exist defaults to ascending order.
<script lang="ts">
  import { page } from '$app/stores'

  type Item = number
  type Order = 'asc' | 'desc'

  let items: Item[] = [1, 2, 3, 4]
  let order: Order = $page.url.searchParams.get('order') ?? 'asc'

  $: sortedItems = sortItems(order)

  function changeOrder() {
    order === 'asc' ? order = 'desc' : order = 'asc'
  }

  function sortItems(order: Order) {
    return order === 'asc' ? items : [...items].reverse()
  }
</script>

<button on:click={changeOrder}>
  {order === 'asc' ? '🔺' : '🔻'}
</button>

<ul>
  {#each sortedItems as item}
    <li>{item}</li>
  {/each}
</ul>
Summary
I want to avoid the famous “it depends” answer and that means I have to give you an opinion that doesn’t represent every use case and it’s more general to help you pick a solution.
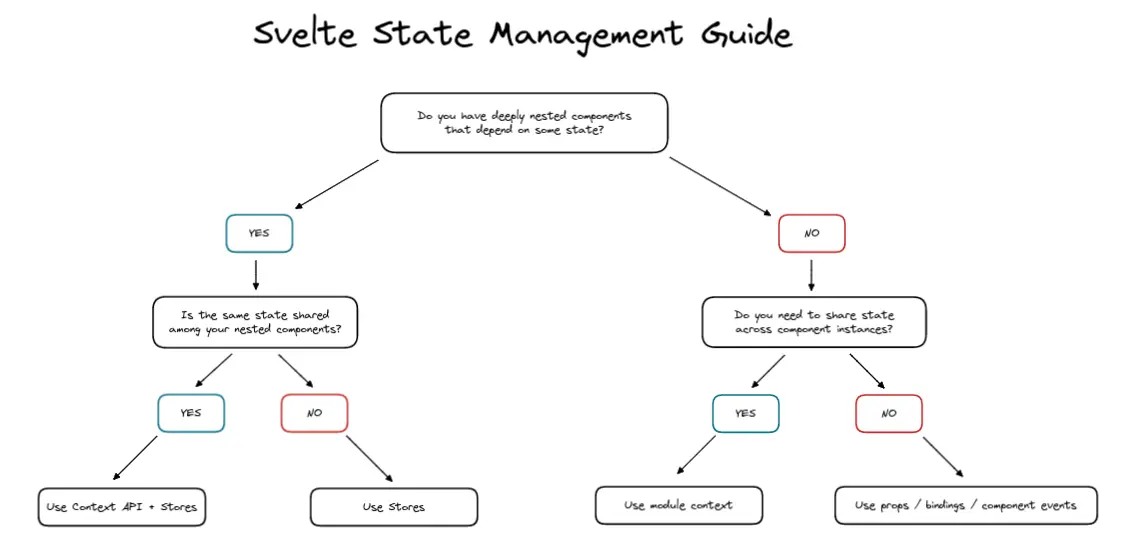
- Do you have deeply nested components that depends on some state?
- YES: Is the same state shared among your nested components?
- YES: Use Context API + Stores
- NO: Use Stores
- NO: Do you need to share state across component instances?
- YES: Use module context
- NO: Use props, bindings, component events
- YES: Is the same state shared among your nested components?
I spent a lot of thought and research writing this post but I can’t decide what state management method to pick for you and I hope at least you have more confidence to make an informed decision.
Thank you for reading! 🏄️