Learn How SvelteKit Works
Published Jul 6, 2022
Table of Contents
- Futuristic Web Development
- SvelteKit Is A Backend Framework
- SvelteKit Uses The Web Platform
- Set Up SvelteKit From Scratch
- Let’s Examine The Generated Output
- The Heart Of SvelteKit
- Client-Side Rendering
- Server-Side Rendering
- Client-Side Navigation
- Hydration
- Adapters
- Summary
Futuristic Web Development
I started web development at the height of the React era when single page applications were all the rage and that meant we had to recreate what browsers already knew how to do from navigation to handling forms in JavaScript to support those types of applications.
As time moved on progressive enhancement was pushed to the side and instead of using JavaScript to enhance the user experience it started being required.
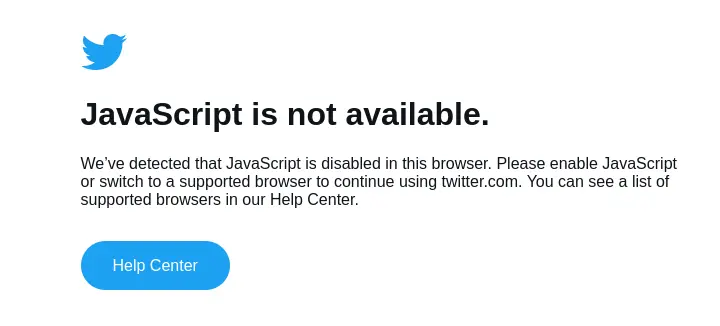
If you disable JavaScript on Twitter it doesn’t work because it’s a single page application that uses React.
Things are starting to change and we’re seeing a shift to the server because we realized despite having a computer in our pocket we shouldn’t do everything in the client because it’s a worse user experience because of the bundle size and having your entire logic in one place JavaScript can fail for whatever reason.
Let me explain some important concepts briefly:
- SSR (server-side rendering) is the process of taking a request from the browser and returning a rendered version of the page as a HTML document as a response which is great for SEO (search engine optimization) because it’s easy to index by crawlers
- CSR (client-side rendering) is the opposite where you send the browser an empty HTML document and let JavaScript handle the rendering for all the content inside it and is great for applications but not for SEO
- SSG (static site generation) is similar to SSR but instead of building a page on demand when you visit a page you prerender the pages in advance you can cache forever and it’s great for SEO but you have to do it each time when you make a change
- SPA (single page application) is a general term used to describe an app that doesn’t need to reload when you change a route and is contained within one page where JavaScript handles everything using CSR
- MPA (multi page application) is the opposite of a SPA where every page you navigate has to refresh the page — think of an eCommerce store because using SSR to load a HTML document is faster than having to wait for a SPA to load JavaScript
SvelteKit is a full stack framework that gives you the best of both worlds where the page is server-side rendered on your first visit but when you navigate to other pages they’re going to be client-side rendered.
SvelteKit gives you levers for your pages to use any of these rendering methods.
The core of SvelteKit provides a highly configurable rendering engine.
Because SvelteKit blurs the line between frontend and backend it might be confusing where your code runs and that’s what I’m going to try to answer.
This post assumes you’re at least familiar with SvelteKit but if you’re not I have an entire SvelteKit For Beginners series and Svelte For Beginners series you can watch.
SvelteKit Is A Backend Framework
Kit isn’t built on top of Svelte but it’s a backend web framework where Svelte is used as the view layer but in theory you could rip it out and replace it with another component framework that supports server-side rendering and the same is true for other web frameworks.
It helps If you’re familiar with HTTP request methods and have prior experience with backend frameworks like Express but it’s not required and you can think of SvelteKit as a replacement because you don’t need a separate backend — SvelteKit is where you write your frontend and backend logic.

Here’s an example of a REST API endpoint in Express.
import express from 'express'

const app = express()

// GET HTTP method
app.get('/', (request, response) => {
  response.json({ message: 'Hello' })
})

// your frontend app would be at http://localhost:3000/
// where you can consume the JSON response from the API
app.listen(4000)
This is the SvelteKit equivalent and they work the same and return a application/json content type response header that returns JSON data from the API.
// you can expose and use this endpoint anywhere
export async function GET({ request }) {
	return {
		body: { message: 'Hello' }
	}
}
Because SvelteKit is the frontend and backend you can deploy everything as a Node server or use Vercel and serverless functions.
You can keep your server separate if you want and it might not be a great idea for making something like Discord but if you need some real-time communication using WebSockets you can create a custom server and I have a post on Using WebSockets With SvelteKit.
Among other things SvelteKit also includes:
- Pages (file based routing)
- Endpoints (API routes)
- Nested layouts (way more powerful than just nesting files because the segment of the URL maps to your component hierarchy)
- Hot module replacement (instant updates in the browser when you make a change preserving application state)
- Preprocessing (TypeScript, SCSS and Pug among others)
- Building component libraries (creating and publishing npm packages)
- Deployment options (adapters for any platform)
SvelteKit Uses The Web Platform
SvelteKit is a machine that takes your code as input and outputs code as you make a change and you can find the generated server and client code in the .svelte-kit folder.
My favorite quote that describes SvelteKit comes from the documentation.
Fundamentally, a SvelteKit app is a machine for turning a Request into a Response.
SvelteKit leverages the web platform and uses the regular Request and Response objects of the Fetch API so it works in any JavaScript runtime that’s not a browser and uses adapters to output the code for the deployment target.
Here’s an example of a simple Request object and fetching the data.
const request = new Request('https://pokeapi.co/api/v2/pokemon', {
  method: 'GET',
  headers: { 'content-type': 'application/json' }
})

console.log(request)

/*
	Request {
	  method: 'GET',
	  headers: { 'content-type': 'application/json' }
		// ...
	}
*/

fetch(request)
  .then(response => response.json())
  .then(response => console.log(response.results))
You would see the same request in SvelteKit.
export async function GET({ request }) {
	const response = await fetch('https://pokeapi.co/api/v2/pokemon')
	const pokemon = await response.json()

	console.log(request)

	/*
		Request {
	  	method: 'GET',
	  	headers: { 'content-type': 'application/json'  }
			// ...
		}
	*/

	return {
		body: pokemon.results,
	}
}
Set Up SvelteKit From Scratch
It only takes a couple of steps and is going to help you understand how SvelteKit works and the difference between server-side rendering and client-side rendering and where your code runs.
Inside an empty folder create a handcrafted 💪 package.json file and specify we’re using ECMAScript modules which is the official format to package JavaScript code for reuse and include the scripts to run it.
{
  "type": "module",
  "scripts": {
    "dev": "vite dev",
    "build": "vite build",
    "preview": "vite preview"
  }
}
Next we have to install Kit, Svelte and Vite as a development dependency.
npm i -D @sveltejs/kit svelte viteIt’s namespaced under the same sveltejs organization on GitHub.
The svelte-kit and vite binaries are under node_modules/.bin that get executed when you run the development server and if you open the file it’s just a script that points to the entry point of your app.
These files are required for SvelteKit to work:
- Add a
vite.config.jsfile - Add a
svelte.config.jsfile - Create a
srcfolder- Add a
src/app.htmlfile - Create a
src/routesfolder- Add a
routes/index.sveltefile
- Add a
- Add a
// you can add plugins and change config options

import { sveltekit } from '@sveltejs/kit/vite'

/** @type {import('vite').UserConfig} */
const config = {
	plugins: [sveltekit()],
}

export default config
// you can add preprocessors and adapters here

/** @type {import('@sveltejs/kit').Config} */
const config = {
	kit: {},
}

export default config<head>
%sveltekit.head%
</head>
<body>
%sveltekit.body%
</body><h1>Home</h1>After you run the npm run dev command the SvelteKit CLI loads the Svelte config and starts the Vite development server and outputs the welcome message in your terminal.
  vite dev server running at:

  > Local: http://localhost:3000/
  > Network: use `--host` to expose
That’s everything you need to set up a basic SvelteKit project. 😎
I’m always amazed how the browser is smart enough to construct a proper HTML page even after the crime we’ve done.
If you run a build it’s going to use Node by default but it’s going to be different based on what adapter you use — preconfigured SvelteKit projects use @sveltejs/adapter-auto that detects your production environment and uses the appropriate adapter.
The SvelteKit project is a monorepo meaning instead of having every package in a separate repository on GitHub it can be in one place instead making it easier to maintain and contribute to.
If you look at packages in the SvelteKit repository you can find:
adaptersfor different platformscreate-sveltewhich is the CLI for creating SvelteKit projectskitbeing the SvelteKit framework and CLI
Let’s Examine The Generated Output
SvelteKit takes your app as the input and creates the output.
When you start the development server SvelteKit generates a .svelte-kit folder that contains a couple of folders:
- generated
client-manifest.jsregenerates pathsclient-matchers.jsregenerates page matchersroot.svelteis the entry point that
- runtime (client and server code copied from
node_modules/@sveltejs/kit/assets - types (generated for each route)
The root.svelte file is interesting because it takes the routes from client-manifest.js that are treated as components and besides initializing some page values it’s in charge of displaying the components.
// regenerated when you change pages
export const components = [
	// layout is at index 0
	() => import("../runtime/components/layout.svelte"),
	// error is at index 1 (ignored if page has no error)
	() => import("../runtime/components/error.svelte"),
	// home page is at index 1 (ignored if page has an error)
	() => import("../../src/routes/index.svelte")
]

// used to map components for the page and check if
// the page has a page endpoint but I'm not sure 😆
export const dictionary = {
	"": [[0, 2], [1]]
}
If you logged the values of the components inside root.svelte you would get an array of Proxy objects that represent components [Proxy<Layout>, Proxy<Index>] which are [0, 1] indexed.
The code is going to be generated based on your pages and the pyramid shape is going to be deeper based on how many named layouts you have but I simplified the code so it’s easier to understand.
{#if components[1]}
	<svelte:component this={components[0]}>
		{#if components[2]}
			<svelte:component this={components[1]}>
				<svelte:component this={components[2]} />
			</svelte:component>
		{:else}
			<svelte:component this={components[1]} />
		{/if}
	</svelte:component>
{:else}
	<svelte:component this={components[0]} />
{/if}
Here’s what’s going on.
if page
	layout
		if page inside named layout
			named layout
				page
			named layout
    else
     page
    /if
	layout
else
	layout
/if
A simple way to see what is generated is to git commit the .svelte-kit folder and comparing the difference after making a change.
Here’s an example of the the client manifest before and after adding a route.
export const components = [
  () => import('../runtime/components/layout.svelte'),
  () => import('../runtime/components/error.svelte'),
  () => import('../../src/routes/index.svelte'),
  () => import('../../src/routes/some/nested/route/index.svelte'),
]

export const dictionary = {
  '': [[0, 2], [1]],
  'some/nested/route': [[0, 3], [1]],
}
The Heart Of SvelteKit
At the heart of SvelteKit is a client-side router that handles everything from intercepting links, handling file-based routing, nested layouts, providing page and navigation stores and watching file changes to regenerate routes but what makes SvelteKit work is Vite as it’s built on top of it.
Vite is a next generation build tool made by the Vue creator Evan You and you can think of it as a replacement for bundlers like webpack and it enables:
- The development server
- Server-side rendering
- Watching files for changes (regenerating routes when adding a page)
- Hot module replacement (updates your page when you make a change)
- Unbundled development (using ES modules)
- Optimized builds (using Rollup)
If you could zoom out and see a visual representation of what makes SvelteKit you would see something like this I consider to be the most relevant.
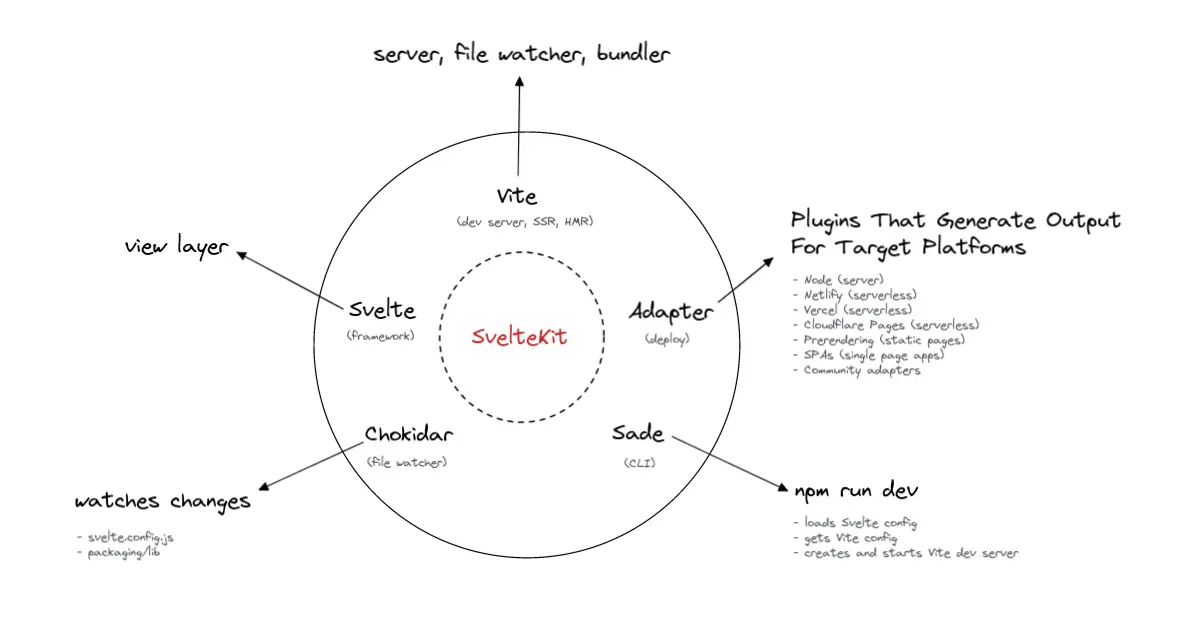
- Vite (development server, file watcher, bundler)
- Adapters (plugins that generate output for target platforms)
- Sade (smooth CLI operator 🎤)
- Chokidar (file watcher also used by Vite)
- Svelte (view layer)
If this was a crime show this would be the part where you say “enhance” so let’s do that for Kit and see what makes it work.
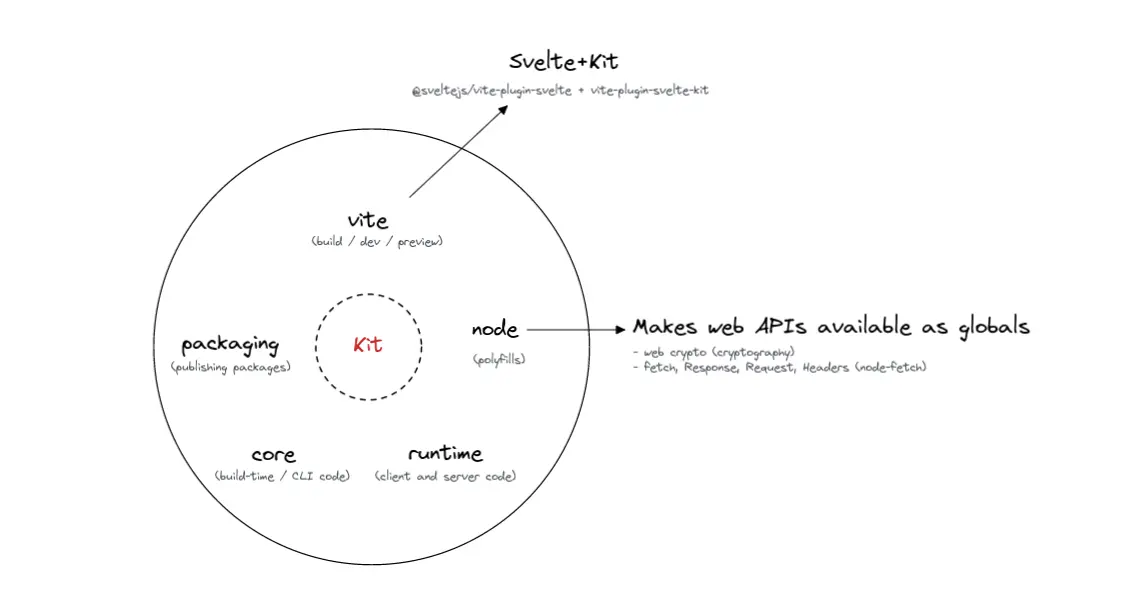
- Vite plugins
vite-plugin-svelteandvite-plugin-svelte-kit - Node that includes polyfills for the Fetch API using
node-fetchand makes web APIs available as globals - Core is the build-time and CLI code
- Runtime is the client and server code
- Packaging is the code for creating and publishing packages
These parts together make Svexodia.

You can see vite-plugin-svelte is used to make Svelte work with Vite and pass it plugin options from compiler options, preprocessors to the inspector that shows you where the element under your cursor is located and open it in your code editor.
The vite-plugin-svelte-kit is interesting because it’s imported from @sveltejs/kit/vite as sveltekit and it’s responsible for taking the SvelteKit config, creating routes, server-side rendering and loading the template replacing the %sveltekit% placeholders inside app.html among other things.
It exports the plugins that are used inside kit/dist/cli.js that returns us to the starting point after you ran npm run dev.
Hope I didn’t lose you! 😄
If you’re confused that’s alright because I’m right besides you trying to understand how it works.
Now that you have a higher level understanding of how SvelteKit works let’s explore how client-side rendering and server-side rendering works.
Client-Side Rendering
You might have to process a lot of data or want to use GraphQL (it’s larger than React 😱) on the client but you’re making the user pay for the compute and bandwidth when the server should do the hard work.
I created an endpoint inside routes/api/pokemon.json.js that uses the PokeAPI and returns a list of Pokemon.
// server API endpoint
export async function GET() {
	const response = await fetch('https://pokeapi.co/api/v2/pokemon')
	const pokemon = await response.json()

	return {
		body: pokemon.results,
	}
}
This shows the benefit of having a backend because you can cherry-pick data you want before you pass it back to the client without the user having to pay the cost.
You might be used to doing something like this in a traditional single page application regardless where you fetch the data from.
<script>
	// client-side rendered
	async function getPokemon() {
		const response = await fetch('/api/pokemon.json')
		return response.json()
	}
</script>

<h1>Pokemon</h1>

{#await getPokemon()}
	<p>Loading...</p>
{:then pokemon}
	{#each pokemon as pokemon}
		<li>{pokemon.name}</li>
	{/each}
{/await}

<style>
	li {
		text-transform: capitalize;
	}
</style>
If you load the page you should see a brief Loading... indicator before fetching and loading the Pokemon data.
I want to make a site that shows every Pokemon and is easily indexed by a search engine, so it shows up in search results to drive traffic to make those sweet Pokemon dollars.
Easy enough, right?
There’s one problem when I go and view page source.
<head>
	<style data-sveltekit>
		li.s-Uap-jPRb-uiE {
			text-transform: capitalize;
		}
	</style>
</head>

<body>
	<h1 class="s-Uap-jPRb-uiE">Pokemon</h1>
	<!-- Dude, where's my markup? -->
	<p class="s-Uap-jPRb-uiE">Loading...</p>
	<!-- ... -->
</body>
If you look at the network tab when the page loads it’s going to fetch http://localhost:3000/api/pokemon.json and return a 200 OK response with the JSON data that JavaScript is going to use to loop over the list of Pokemon and show it on the page.
This should be expected because we’re not using server-side rendering (don’t confuse the API endpoint we made for server-side rendering) but doing the data fetching on the client and using client-side rendering.
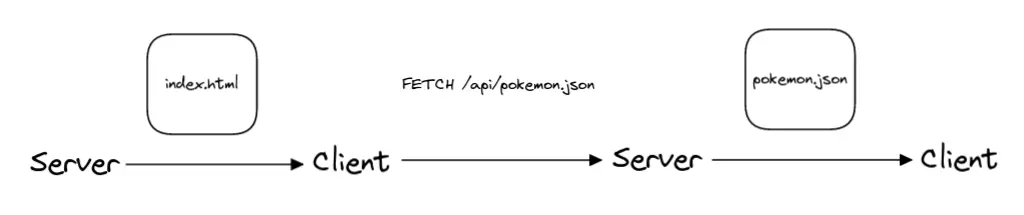
Client-side rendering is less resilient because JavaScript can fail for whatever reason but it also has the downside of making the round-trip to get the data.
Google says it can crawl sites with JavaScript but it’s not cheap to do because you have to open the page in a headless browser and execute JavaScript for millions of sites compared to looking at a HTML page and indexing it, so you’re going to get penalized if you want great SEO.
Once Googlebot’s resources allow, a headless Chromium renders the page and executes the JavaScript.
Server-Side Rendering
Server-side rendering has improved performance because everything loads when it’s ready even if you have to wait for it compared to showing a loading spinner and content loading after causing layout shifts.
To server-side render the Pokemon data we need to fetch the Pokemon on the server instead of the client.
You’ve probably done it before.
<script context="module">
	// server-side rendered
	export async function load({ fetch }) {
		const response = await fetch('api/pokemon.json')

		return {
			props: {
				pokemon: await response.json(),
			},
		}
	}
</script>

<script>
	export let pokemon
</script>

<h1>Pokemon</h1>

<ul>
	{#each pokemon as pokemon}
		<li>{pokemon.name}</li>
	{/each}
</ul>

<style>
	li {
		text-transform: capitalize;
	}
</style>
A page can export a load function inside the module context script that runs before the component is created and it runs during server-side rendering and in the client.
If your page depends on data that’s only used for that page you can reduce boilerplate if you use page endpoints.
Here’s a brief aside If you don’t know how module context works because it’s useful outside SvelteKit.
In Svelte every component is an instance.
// this file is a module

console.log('context module')

export class Component {
	constructor() {
		console.log('component')
	}
}import { Component } from './Component.js'
// logs "context module" once
const component1 = new Component() // logs "component"
const component2 = new Component() // logs "component" againThe context module part is what happens in <script context="module"> and component is what happens inside the <script> tag.
If you remember our diagram for Kit showed how the node package makes web APIs available as globals including node-fetch and you might have noticed we’re using the window.fetch method inside load that SvelteKit provides because the Fetch API wasn’t supported in Node until recently.
This wasn’t the case for api/pokemon.json because that only runs on the server but the page is going to run on the server and the client and it would throw an error.
Long story short — everything happens on the server.
If you open the page it’s going to be server-side rendered meaning if you look at the HTML document that the server responds with you’re going to see the data.
<head>
	<style data-sveltekit>
		li.s-Uap-jPRb-uiE {
			text-transform: capitalize;
		}
	</style>
</head>

<body>
	<h1 class="s-Uap-jPRb-uiE">Pokemon</h1>

	<ul class="s-Uap-jPRb-uiE">
		<li class="s-Uap-jPRb-uiE">bulbasaur</li>
		<li class="s-Uap-jPRb-uiE">ivysaur</li>
		<li class="s-Uap-jPRb-uiE">venusaur</li>
		<li class="s-Uap-jPRb-uiE">charmander</li>
		<li class="s-Uap-jPRb-uiE">charmeleon</li>
		<li class="s-Uap-jPRb-uiE">charizard</li>
		<li class="s-Uap-jPRb-uiE">squirtle</li>
		<li class="s-Uap-jPRb-uiE">wartortle</li>
		<li class="s-Uap-jPRb-uiE">blastoise</li>
		<li class="s-Uap-jPRb-uiE">caterpie</li>
		<li class="s-Uap-jPRb-uiE">metapod</li>
		<li class="s-Uap-jPRb-uiE">butterfree</li>
		<li class="s-Uap-jPRb-uiE">weedle</li>
		<li class="s-Uap-jPRb-uiE">kakuna</li>
		<li class="s-Uap-jPRb-uiE">beedrill</li>
		<li class="s-Uap-jPRb-uiE">pidgey</li>
		<li class="s-Uap-jPRb-uiE">pidgeotto</li>
		<li class="s-Uap-jPRb-uiE">pidgeot</li>
		<li class="s-Uap-jPRb-uiE">rattata</li>
		<li class="s-Uap-jPRb-uiE">raticate</li>
	</ul>

	<!-- ... -->
</body>
Instead of doing a round-trip when using client-side rendering before we use server-side rendering to get everything from the server and show it to the user.
Another interesting aside is what SvelteKit does with the fetch response:
- During server-side rendering the response will be captured and inlined into the rendered HTML
- During hydration the response will be read from the HTML preventing an additional network request
<!-- ... -->

<script
	type="application/json"
	sveltekit:data-type="data"
	sveltekit:data-url="api/pokemon.json"
>
	{
		"status": 200,
		"statusText": "",
		"headers": { "content-type": "application/json; charset=utf-8" },
		"body": "..."
	}
</script>
I’m going to explain hydration later.
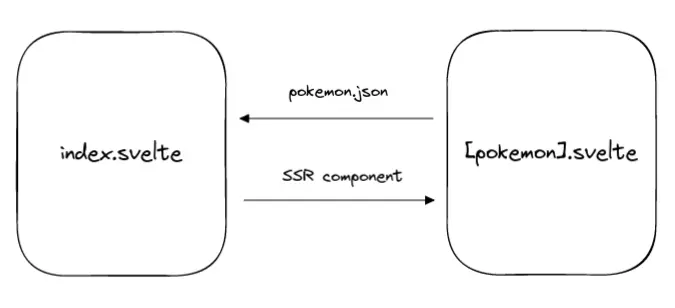
Client-Side Navigation
Loading a SvelteKit page for the first is going to use server-side rendering (SSR) but after the SvelteKit router gets initialized, any further navigations are going to use JavaScript for client-side rendering (CSR) like a regular single page application (SPA).
<a href="/pikachu">Pikachu</a>You might want to have a special page for every Pokemon so I created [pokemon].svelte as an example route that doesn’t do anything.
<a href="/">Home</a>Open your network tab and check the “disable cache” checkbox.
If you navigate from / to /pikachu you can see a GET request to http://localhost:3000/src/routes/[pokemon].svelte that returns a server-side rendered Svelte component that hydrates the page if you look at the preview tab.
If you navigate from /pokemon back to / you can see a GET request for http://localhost:3000/api/pokemon.json and if that was a page endpoint it would be __data.json.
When you load a page the favicon in your browser tab spins indicating the page is loading but if you look at it during navigation you’re going to notice it doesn’t indicating client-side navigation.
Since the client is loaded SvelteKit can intercept the requests and bypass the normal browser navigation unless you refresh the page or load it from the URL because SvelteKit has to rebuild everything.
You can add the global browser.router config option or add page options to disable client-side router and even use sveltekit:reload on links that’s going to cause the browser to do a full page reload to see how it works.
Hydration
When a user requests a page the server sends a “dry” HTML page where the components are rendered as HTML but to make the page interactive with JavaScript hydration is used to load the JavaScript and make the page interactable.
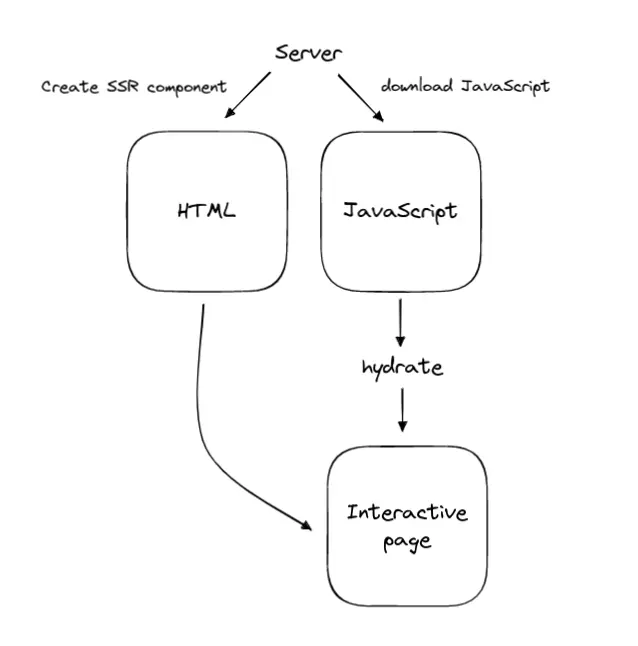
Hydration sounds like a fancy term but it just means adding JavaScript back to your server-side rendered HTML page.

If you want to learn more @lihautan has a great video explaining how hydration works.
This is important to understand because your page runs both on the server and client — first the page has to be server-side rendered on the server and sent back as HTML so you have to re-render it on the client to hydrate the page.
Because of this if you try to talk to a database inside the load function you’re going to realize it doesn’t work without using an endpoint because load runs on the server and client while an endpoint only runs on the server.
You can try it out yourself if you log console.log('Hello') which is going to output Hello on the server (your terminal) and client (browser console).
Knowing this makes reading the warning from the SvelteKit documentation for loading start to make a lot more sense:
- Use the SvelteKit provided fetch wrapper rather than using the native fetch (because it runs on the server and you need to fetch the data to server-side render it)
- Don’t reference window, document, or any browser-specific objects (because it runs on the server where those don’t exist)
- Don’t directly reference any API keys or secrets, which will be exposed to the client, but instead call an endpoint that uses any required secrets (because the page gets server-side rendered and then it needs to re-render on the client because of hydration)
Let’s look at an example of how this works.
<script>
	let count = 0
</script>

<button on:click={() => count += 1}>
	{count}
</button>
You can use the Svelte REPL to see the compiled output.
Since we’re using server-side rendering we need to turn the component into a string and return it as HTML and that’s what the Svelte compiler does if you pass it SSR as an option.
import { create_ssr_component, escape } from 'svelte/internal'

const App = create_ssr_component(
  ($$result, $$props, $$bindings, slots) => {
  	let count = 0
    return `<button>${escape(count)}</button>`
  }
)
This is used for server-side rendering to return the component as HTML and that’s why you need hydration.
How does Svelte know what elements it needs to hydrate?
This is where the hydratable option comes into play and if you switch back the generate option to DOM for the compiler you can see the compiled Svelte code.
I simplified the code so we can focus on the interesting part.
function create_fragment(ctx) {
	let button
	let t

	return {
		c() {
			button = element('button')
			t = text(/*count*/ ctx[0])
		},
		l(nodes) {
			button = claim_element(nodes, 'BUTTON', {})
			var button_nodes = children(button)
			t = claim_text(button_nodes, /*count*/ ctx[0])
			button_nodes.forEach(detach)
		},
		m(target, anchor) {
			insert_hydration(target, button, anchor)
			append_hydration(button, t)
		}
	}
}
This takes care of creating, claiming and mounting the elements.
I made the same component in SvelteKit and this is the response from count.svelte in the network tab after I cleaned it up.
counter.svelte
// imports

const file = 'src/routes/counter.svelte'

function create_fragment(ctx) {
	let button
	let t
	let mounted
	let dispose

	const block = {
		c: function create() {
			button = element('button')
			t = text(/*count*/ ctx[0])
			this.h()
		},
		l: function claim(nodes) {
			button = claim_element(nodes, 'BUTTON', {})
			var button_nodes = children(button)
			t = claim_text(button_nodes, /*count*/ ctx[0])
			button_nodes.forEach(detach_dev)
			this.h()
		},
		h: function hydrate() {
			add_location(button, file, 8, 0, 99)
		},
		m: function mount(target, anchor) {
			insert_hydration_dev(target, button, anchor)
			append_hydration_dev(button, t)

			if (!mounted) {
				dispose = listen_dev(
					button,
					'click',
					/*click_handler*/ ctx[1],
					false,
					false,
					false
				)
				mounted = true
			}
		},
		p: function update(ctx, [dirty]) {
			if (dirty & /*count*/ 1) set_data_dev(t, /*count*/ ctx[0])
		},
		i: noop,
		o: noop,
		d: function destroy(detaching) {
			if (detaching) detach_dev(button)
			mounted = false
			dispose()
		},
	}

	return block
}

let hydrate = true

function instance($$self, $$props, $$invalidate) {
	let { $$slots: slots = {}, $$scope } = $$props
	validate_slots('Counter', slots, [])
	let count = 0

	const click_handler = () => $$invalidate(0, (count += 1))
	$$self.$capture_state = () => ({ hydrate, count })

	$$self.$inject_state = ($$props) => {
		if ('count' in $$props) $$invalidate(0, (count = $$props.count))
	}

	if ($$props && '$$inject' in $$props) {
		$$self.$inject_state($$props.$$inject)
	}

	return [count, click_handler]
}

class Counter extends SvelteComponentDev {
	constructor(options) {
		super(options)
		init(this, options, instance, create_fragment, safe_not_equal, {})
	}
}

export default Counter

export { hydrate }
It’s not that hard to read to at least get an idea of what’s going on and it looks similar to the code from the Svelte REPL — if you look at the instance function you can see the click_handler code for our counter.
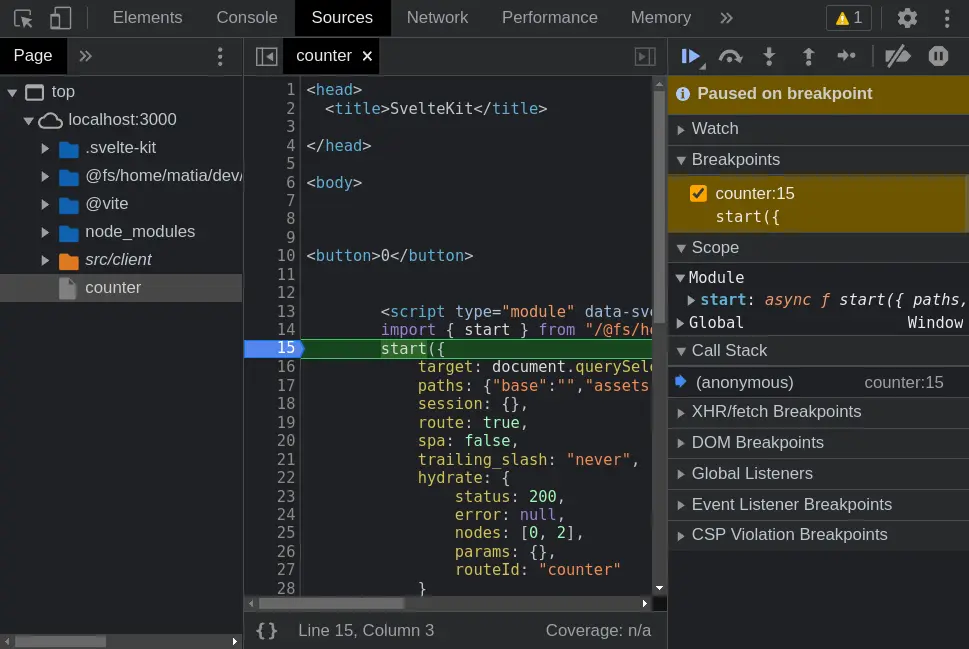
If you view page source you can see the hydrate script added by SvelteKit.
<body>
	<button>0</button>

	<script type="module" data-sveltekit-hydrate="ocsxhs">
		import { start } from '/@fs/home/matia/dev/sveltekit-explained/.svelte-kit/runtime/client/start.js'
		start({
			target: document.querySelector('[data-sveltekit-hydrate="ocsxhs"]')
				.parentNode,
			paths: { base: '', assets: '' },
			session: {},
			route: true,
			spa: false,
			trailing_slash: 'never',
			hydrate: {
				status: 200,
				error: null,
				nodes: [0, 2],
				params: {},
				routeId: 'counter',
			},
		})
	</script>
</body>
If you go to the sources tab in your developer tools inside counter.svelte and put a breakpoint on the line that invokes the start function you can step through it if you’re adventurous.
This is where the magic happens inside .svelte-kit/runtime/client/start.js.
async function start({
	paths, target, session, route, spa, trailing_slash, hydrate
}) {
	// Create client
	const client = create_client({
		target,
		session,
		base: paths.base,
		trailing_slash
	});

	// initialize client
	init({ client })
	set_paths(paths)

	// hydration
	if (hydrate) {
		await client._hydrate(hydrate)
	}

	// routing
	if (route) {
		if (spa) client.goto(location.href, { replaceState: true })
		client._start_router()
	}

	// used for testing I think 🤷
	dispatchEvent(new CustomEvent('sveltekit:start'))
}
If you step into the _hydrate function you can see how SvelteKit loads the JavaScript modules required for the page from the manifest.
_hydrate: async ({ status, error, nodes, params, routeId }) => {
	// ...

	// loops through nodes from the hydrate object
	for (let i = 0; i < nodes.length; i += 1) {
		const node = await load_node({
			// nodes: [0, 2] from client-manifest.js
			// 0: Proxy<Layout>
			// 2: Proxy<Counter>
			module: await components[nodes[i]](),
			// ...
		})
	}

	// ...
}
Server-side rendering is a hard problem because you need to make sure what you have on the server and client matches and I’m grateful I don’t have to think about it.
Adapters
If you don’t specify an adapter or use adapter-auto SvelteKit is going to output for Node if it can’t detect a supported production environment.
I’m going to install adapter-node and import it inside svelte.config.js.
npm i -D @sveltejs/adapter-nodeYou can enable source maps for the build output if you want to debug the production build and disable minification to be able to look at the code.
import { sveltekit } from '@sveltejs/kit/vite'

/** @type {import('vite').UserConfig} */
const config = {
	plugins: [sveltekit()],
	build: {
		sourcemap: false,
		minify: false,
	},
}

export default config
After you run npm run build it’s going to generate a build and output folder inside .svelte-kit for npm run preview but what you deploy is generated at the root of your project inside the build folder.
.
├── client
│   └── _app
│       ├── immutable
│       │   ├── assets
│       │   │   └── pages
│       │   │       └── index.svelte.css
│       │   ├── chunks
│       │   │   └── index.js
│       │   ├── error.svelte.js
│       │   ├── layout.svelte.js
│       │   ├── manifest.json
│       │   ├── pages
│       │   │   ├── counter.svelte.js
│       │   │   └── index.svelte.js
│       │   └── start.js
│       └── version.json
├── handler.js
├── handler.js
├── index.js
├── manifest.js
├── multipart-parser.js
├── server
│   ├── chunks
│   │   ├── hooks.js
│   │   └── index.js
│   ├── entries
│   │   ├── endpoints
│   │   │   └── api
│   │   │       └── pokemon.json.js
│   │   ├── fallbacks
│   │   │   ├── error.svelte.js
│   │   │   └── layout.svelte.js
│   │   └── pages
│   │       ├── counter.svelte.js
│   │       └── index.svelte.js
│   ├── index.js
│   ├── manifest.js
│   ├── manifest.json
│   └── nodes
│       ├── 0.js
│       ├── 1.js
│       ├── 2.js
│       └── 3.js
├── shims-dda63f8c.js
└── shims.js
You’re going to see the file names include a unique hash like index.svelte-f58f5bb5.css to bust the cache when you redeploy because a CDN (content delivery network) would cache a static asset like index.svelte.css forever.
The client folder has client code including static assets like HTML, CSS and JavaScript and the server folder has server code including endpoints and you can gleam SvelteKit uses Polka as the web server.
What if you wanted to prerender the Pokemon once and cache it forever instead of having to rebuild it every time someone visits the page?
<script context="module">
	export let prerender = true
	// ...
</script>
If you run npm run build you’re going to notice SvelteKit generated a prerendered folder.
.
├── api
│   └── pokemon.json
└── index.html
The pokemon.json file includes the fetch response so when you request the page it’s going to send the prerendered index.html that has the fetch response inlined but you can go a step further and even disable hydration and the router for the page if you don’t want to ship any JavaScript.
If you want you can even use adapter-static to generate a single-page application if you specify a fallback page.
import adapter from '@sveltejs/adapter-static'

/** @type {import('@sveltejs/kit').Config} */
const config = {
	kit: {
    adapter: adapter({ fallback: 'index.html' }),
  }
}

export default config
Let’s look at adapter-vercel because instead of a traditional Node server it uses serverless functions instead.
If I was SvelteKit and had to figure out how to create the output required for Vercel I would probably start with their documentation but thankfully we don’t have to.
The Build Output API closely maps to the Vercel product features in a logical and easy-to-understand format. It is primarily targeted toward authors of web frameworks who would like to utilize all of the Vercel platform features, such as Serverless Functions, Edge Functions, Routing, Caching, etc.
Let’s change the adapter to use adapter-vercel.
import adapter from '@sveltejs/adapter-vercel'

/** @type {import('@sveltejs/kit').Config} */
const config = {
	kit: {
		adapter: adapter(),
}

export default config
This is going to create a .vercel_build_output folder at the root.
.
├── config
│   └── routes.json
├── functions
│   └── node
│       └── render
│           ├── index.js
│           └── package.json
└── static
    └── _app
        ├── immutable
        │   ├── assets
        │   │   └── pages
        │   │       └── index.svelte.css
        │   ├── chunks
        │   │   └── index.js
        │   ├── error.svelte.js
        │   ├── layout.svelte.js
        │   ├── manifest.json
        │   ├── pages
        │   │   ├── counter.svelte.js
        │   │   └── index.svelte.js
        │   └── start.js
        └── version.json
As you can see it’s very similar to what we’ve seen before only it’s tailored for Vercel and I hope this makes it more clear how these things work.
Inside the config folder is a routes.json files that is responsible for URL overrides and pages are inside the static folder with the same structure as before but the endpoints are now inside a serverless functions folder that has the server logic.
Summary
Hope I didn’t lose you but more importantly I hope reading the post didn’t leave an impression like you have to understand everything because I don’t even after spending hours looking at the source code.
Here’s the takeaway:
- SvelteKit is a backend framework and compiler
- You write your frontend and backend code in one place
- SvelteKit uses the web platform
- Server-side rendering has improved performance and SEO
- Pages are rendered on the server and client because of hydration
- Adapters are used to deploy to different target platforms
Thank you for reading! 🏄️