Learn Problem Solving
Published Jun 14, 2022
Table of Contents
- Learning Problem Solving
- Think About The Problem Before You Code
- Break Down The Problem
- Get Your Hands Dirty
- Learn How Others Write Code
- Think Using Data Structures
- Learn How To Manipulate Data
- Learn CRUD Operations
- Practice Reading Documentation
- Question Everything
- Write About What You Learned
Learning Problem Solving
Do you feel stuck after watching hours of courses and tutorials on YouTube but now when there’s no one to guide you through it you feel completely lost?
I want to assure you that’s normal and there’s a cure — the reason you’re in this position is because you never considered how problem solving and learning how to learn is a skill you have to practice besides coding.
I want to help you learn how to learn by showing you ten methods how to approach and practice problem solving you can try yourself and see if it works for you.
I always think of tutorials as an appetizer to get an understanding of something but if you treat it as the main meal you’re going to be unsatisfied from the empty calories.
This happens when you’re a passive consumer of content and not actively using your brain to think about problems and it’s equivalent to watching someone exercise for you.
Don’t beat yourself up because the problem isn’t your born ability and you can practice and improve upon it.
I’m a self-learner and don’t have any computer science background or anything that would give me an advantage over you and I tried and gave up coding countless times not because it was hard but because I didn’t understand how it’s useful to me.
Whatever your motivation is I want you to know that you don’t have to fit the coder stereotype when it comes to being a developer — I’m not particularly good at or enjoy math problems, coding challenges or algorithms and you don’t have to either.
I don’t want to say it’s irrelevant because there’s a lot of different jobs when it comes to web development but it’s not something you use regularly as a web developer.
Think About The Problem Before You Code
Everything is a problem even if you don’t think of it that way.
Before an artist decides to use their expensive paints they spend a lot of time sketching out their idea beforehand — If you want to do something do it with intent and purpose instead of looking at a blank canvas and expecting code to pour out of your mind.
Stop and think about the requirements.
Sketch out what you’re making using analog tools such as a pen and piece of paper. I love using Excalidraw because it feels great to use but use whatever you want.
Let’s sketch out the requirements for a to-do list.
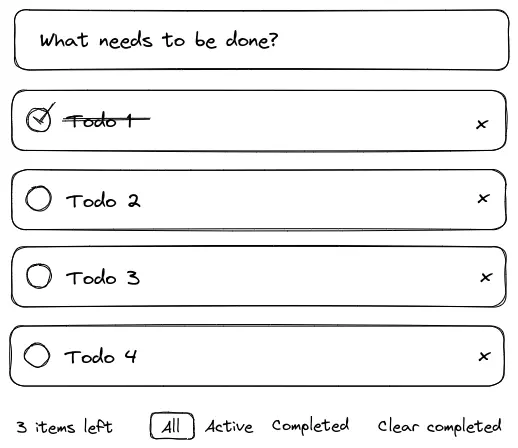
You should be able to:
- Enter and submit a to-do item
- Mark a to-do item as completed
- Edit the to-do item
- Remove a to-do item
- Show how many uncompleted to-do items are left
- Filter to-do items by ALL, ACTIVE, COMPLETED
- Clear completed to-do items
Requirements help you understand the problem and give you a clear goal what you have to do and bring up questions you might have and show potential problems.
Questions move your forward to a solution.
You can turn requirements into tasks and mark some of them as being a stretch goal and focus on what’s important.
Since you understand the requirements and have an idea of what you have to do to get from point A to point B you’re going to avoid being overwhelmed by unknowns that leads to abandoning projects because you can manage the level of complexity.
Break Down The Problem
If you only look at the finished product you’re going to get overwhelmed.
You have to break the problem down into components or atoms to have a starting point.
I love how Bob Ross teaches us about life in general through his paintings because he shows how he got to the final result and encourages you that you’re able to do the same by teaching you his framework of thinking.
The most complicated piece of code started with one line of code.
One of my favorite examples when learning something is creating the TodoMVC example because the requirements show the most important parts about using what I’m learning.
The example has a lot of window dressing because of the CSS making it appear more than it is but if you strip down the styles and look at the bare HTML you’re left with something simple.
The sane advice you’re going to hear a lot is “work on projects” but if you’re an absolute beginner you don’t know where to start and things haven’t started to come together yet.
How do you know if you know enough JavaScript to get started working on projects?
After you learn the fundamentals of JavaScript you’re going to learn the answer through working on projects because it’s going to show the holes in your knowledge.
There is no such thing as mastery and don’t make the mistake of thinking you have to learn everything because you can spend years learning about one thing — this is the trap of learning for sake of learning, so avoid it because you’re going to be more excited to learn about something when you understand how it can help you solve a problem.
Learning is a marathon and not a race meaning you’re going to reference the same things for years and deepen your knowledge and it’s not done once you finish a course.
Break down the problem you’re trying to solve into smaller problems and avoid the ones that scare you.
Since we understand the requirements let’s start with the simplest one being able to add an item to the to-do list.
The most basic thing you can start with is having an input field.
<input type="text" placeholder="What needs to be done?" />You’re not concerned how the entire thing works together but solving one problem at a time and if you end up with spaghetti code that’s awesome because you’re learning and the next time you’re going to improve and nothing is wasted.
Don’t be afraid to make mistakes because they teach you the most.
The next step would be adding an event listener to the input and figuring out how to store the todo item if you press Enter and show the list of to-do items.
If you don’t know a lot about JavaScript event listeners this is the part where you would do some research and find out how to do something based on what key you pressed.
Looking up how to do things is a basic part of development.
You can use comments like pseudocode to describe what you think should happen and break things down into more steps which are like questions that move you forward.
<script>
  // get the elements

	// store todos

	// add event listener
    // check if user pressed Enter
      // add todo
      // clear input
			// show output
</script>
The hard part is knowing what you have to look up when you’re trying to do something so this can help you out.
You might not know a lot about using JavaScript events, so always use keywords in your search such as “javascript, detect key, enter” to help you find what you want.
Never doubt if your solution is “right” if it works and don’t compare yourself to other but only compare yourself to what you knew yesterday.
Try doing the above exercise yourself before you look at the code.
<!-- add todo -->
<input class="todo" type="text" placeholder="What needs to be done?" />

<!-- output -->
<div class="todos"></div>

<script>
  // get the elements
  const todoEl = document.querySelector('.todo')
  const todosEl = document.querySelector('.todos')

  // store todos
  const todos = []

  // add event listener
  todoEl.addEventListener('keydown', (event) => {
    let todoText = event.target.value

    // check if user pressed Enter
    if (event.key === 'Enter') {
      // add todo
      todos.push({ text: todoText })

      // clear input
      todoText = ''

      // show output
      todosEl.innerHTML = `
        <pre>
          ${JSON.stringify(todos, null, 2)}
        </pre>
      `
    }
  })
</script>
Get Your Hands Dirty
Don’t be lazy when you’re learning something and think that watching or reading about it once is enough.
If you truly want to learn you have to get your hands dirty.
If you don’t understand something start from scratch and repeat that step until you develop muscle memory because you’re going to be less overwhelmed by syntax and can focus on the mechanics of how it works.
Trying to learn syntax and how to use something at the same time is equivalent of learning how to play the guitar and sing at the same time.
In the case of a tutorial take notes of the requirements, so you can try doing it yourself otherwise you’re not going to even remember how to start the project and if you’re trying to learn some harder JavaScript concept like map or filter type it out a hundred times until you get it.
Remembering syntax isn’t important here but developing muscle memory and being comfortable using something.
Feeling uncomfortable is an indicator you’re learning because you’re challenging yourself but you shouldn’t feel angry and frustrated, so know when to stop — your brain craves instant gratification but you have to learn to recognize and resist it.
Five minutes of practice a day is more valuable than making excuses and trying to make up for everything on the weekend and get crushed trying to learn everything at once.
You’re going to feel frustrated when you move at a snail’s pace but you’re going to learn and grow faster than farming tutorials because you’re exercising your brain just like going to the gym.
As you learn and improve at your craft you’re going to start recognizing patterns and be able to learn things quicker because of your past experience and you’re never going to know everything but you’re going to have confidence you can figure it out.
Identify what makes you feel insecure instead of avoiding it and use repetition until it becomes second nature.
Learn How Others Write Code
It takes time and practice but you can look at any open source code on GitHub and learn how it works as part of your open source education.
Looking at code someone else wrote teaches you a lot about how someone with more experience writes and structures code and solves a particular problem and makes you better at your craft.
One thing tutorials skip for sake of time and keeping your interest is not showing you how a lot of the code you write is going to include validation and error handling to the point you’re going to feel you’re doing something wrong.
Code you see in most tutorials.
async function fetchPokemon(pokemon) {
  const response = await fetch(`https://pokeapi.co/api/v2/pokemon/${pokemon}`)
  return await response.json()
}
Actual production code you might write.
async function fetchPokemon(pokemon) {
  if (!pokemon || typeof pokemon !== 'string') {
    throw new Error('You have to pass a Pokemon.')
  }

  try {
    const response = await fetch(`https://pokeapi.co/api/v2/pokemon/${pokemon}`)

    if (!response.ok) {
      throw new Error('Something went wrong.')
    }

    return await response.json()
  } catch(error) {
    throw new Error(error)
  }
}
Reverse engineering is the best way to improve your craft and reading source code might look like sorcery but the more you practice reading and understand code it’s going to read like poetry.
Learn how the tool you use works at a higher level to help your mental model when you run into an issue that’s different than what you were expecting.
A great exercise you can do is when you look at some piece of code ask yourself how the code might work under the hood or you can come up with your own syntax using wishful coding and go backwards and figure out how you would implement it.
const sum = 2 + 2
const expected = 4

// how can you chain methods like this?
expect(sum).toBe(expected)
If you look at that example can you see the code?
const sum = 2 + 2
const expected = 4

function expect(value) {
  return {
    toBe(expected) {
      if (value !== expected) {
        console.error(`${value} doesn't equal ${expected} 💩`)
      } else {
        console.log(`${value} equals ${expected} ✅`)
      }
    }
  }
}

expect(sum).toBe(expected)
I remember thinking how jQuery’s $ syntax is magic until I realized it’s just a name for a function and that blew my mind.
$('button').click(() => {
  console.log('Clicked')
})
I could look at how it’s implemented in jQuery but it’s not that different from the previous example.
<button>Click</button>

<script>
	function $(element) {
	  const el = document.querySelector(element)

	  return {
	    click(callback) {
	      el.addEventListener('click', callback)
	    }
	  }
	}

	$('button').click(() => {
	  console.log('Clicked')
	})
</script>
It’s going to take you time and practice but nothing worth pursuing is easy.
Think Using Data Structures
Change in your application state should drive the user interface.
For example an audio player might look like a complicated piece of machinery because it has a lot of parts like being able to load and play the audio and changing the song playing but how does that look represented in your mind?
The reason you have a hard time translating idea into code is because you’re not thinking about how the audio player looks represented as a data structure and how to manipulate it to do what you want and using state to drive the change in the user interface.
A simple audio player should at least be able to:
- Play and pause the song
- Skip or rewind song
- Change the song
Figuring out how to toggle between a playing and paused state might not be hard but you might get stuck thinking how to change the playing state or playing the next and previous song.
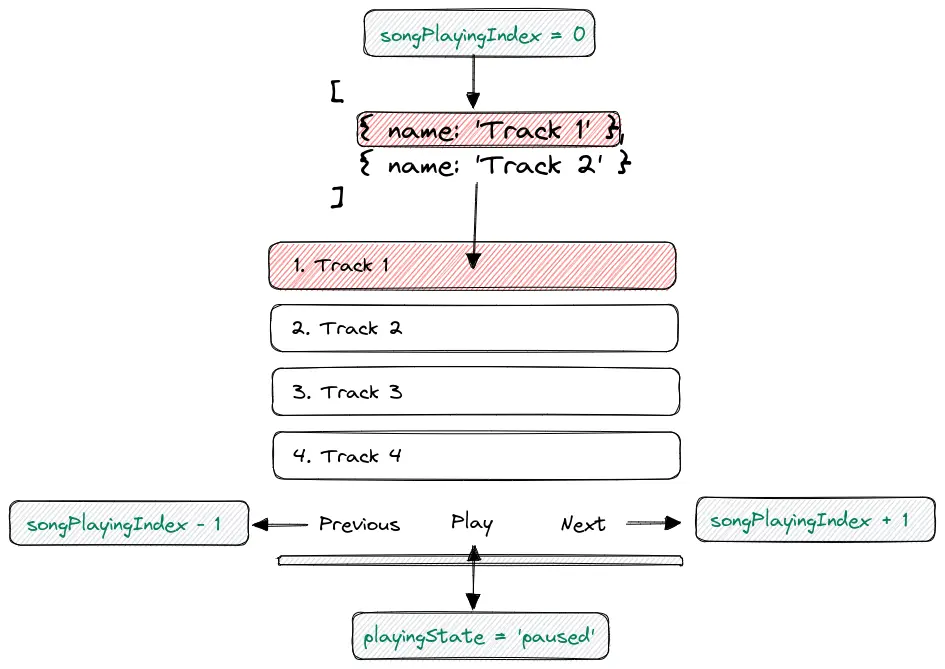
The data structure representing the audio player is nothing more than an array representing a playlist where each object represents a song.
const playlist = [
	{ name: 'Track 1', audio: 'url' },
	{ name: 'Track 2', audio: 'url' }
]
State are just values that represent the state of your application.
// audio player
const playlist = [
	{ name: 'Track 1', audio: 'url' },
	{ name: 'Track 2', audio: 'url' }
]

// state
let playingState = 'paused'
let songPlayingIndex = 0

// example
playlist[songPlayingIndex].audio.play()
Using playingState you know when the audio is playing or paused and songPlayingIndex keeps track of what song is playing.
As an exercise try implementing play and pause feature that changes the playingState state from playing to paused and playPreviousSong and playNextSong feature using songPlayingIndex to drive the state of the application.
For extra points try adding a shuffle and repeat feature.
const playlist = [
	{ name: 'Track 1', audio: 'url' },
	{ name: 'Track 2', audio: 'url' }
]

let playingState = 'paused'
let songPlayingIndex = 0

function play() {
  playingState = 'play'

	currentlyPlaying = playlist[songPlayingIndex].name
  console.log(`Playing ${currentlyPlaying}`)
}

function pause() {
  playingState = 'paused'
	console.log('Paused.')
}

function playPreviousSong() {
  songPlayingIndex -= 1
  play()
}

function playNextSong() {
  songPlayingIndex += 1
  play()
}

play() // 'Playing Track 1'
playNextSong() // 'Playing Track 2'
playPreviousSong() // 'Playing Track 1'
pause() // 'Paused.'
Thinking in data structures helps you solve logic problems and now that you wrote the logic you can use state to drive the user interface and do whatever you want.
How does an audio player know to play a song you pressed play on?
For me it’s easier if I write the static HTML first and go backwards and make it dynamic after I understand the solution.
<div>
  <button data-index="0" onclick="play(event)">Play</button>
  <span>Track 1</span>
</div>

<div>
  <button data-index="1" onclick="play(event)">Play</button>
  <span>Track 2</span>
</div>

<script>
  function play(event) {
    const songIndex = event.target.dataset.index
    console.log(`You selected Track ${songIndex}`)
  }
</script>
I isolated the problem so I don’t have to think about the moving parts and focus on solving one problem at a time — reproducing a problem like this lets you share it with others when asking for help.
I only need to dynamically render the playlist in the browser and drive the user interface based on the user action regardless if you’re using plain JavaScript or using a JavaScript framework that makes working with the user interface a lot easier the principle is the same.
Here’s an example of everything put together using the JavaScript framework Svelte that looks close to regular HTML, CSS and JavaScript.
Learn How To Manipulate Data
As a frontend developer most of your time spent is turning an API response into something you can show in the browser and that’s why you have to learn how to manipulate arrays and objects in JavaScript.
Using map and filter to manipulate arrays is going to be your bread and butter but there’s other useful methods such as includes, some, find — you can learn reduce if you want that’s everything combined but it’s harder to read than chaining methods, so I prefer using chaining and having readable code over clever code.
For working with arrays and objects using …spread is useful because it’s easy to merge data but also you can avoid mutating values by creating a copy of something.
const cavendish = {
	type: 'banana',
	variety: 'Cavendish'
}

const ripeCavendish = {
	...cavendish,
	color: 'yellow',
	ripeness: 'ripe'
}

const bananaVarieties = [cavendish]

bananaVarieties = [...bananaVarieties, { variety: 'Plantain' }]
Data structures and algorithms and being able to solve coding challenges doesn’t reflect your ability as a developer, so don’t waste your time and work on projects instead unless you have to learn those things.
To practice manipulating data I love using the Pokemon API because it has a lot of data you can play around with — start with something simple and display the Pokemon and their information in a card.
This is going to teach you important concepts such as data fetching in JavaScript and reading the PokeAPI documetation is a great start to practicing reading documentation.
You can find a lot of videos on using the Pokemon API in JavaScript if you need help. Use every resource you can but do it yourself after until you understand it.
async function getPokemon() {
	// read the documentation to learn how to use the api
	const response = await fetch('https://pokeapi.co/api/v2/pokemon')
	return await response.json()
}

getPokemon().then(pokemon => console.log(pokemon))
You can loop over the list of Pokemon and fetch data for each one you can store and show inside a card.
Learn CRUD Operations
I love using a to-do list as an example because it teaches you about creating, reading, updating and deleting data or CRUD that’s the backbone of anything you do and the same is true if you’re creating or using an API.
You can visit any popular site and it’s just a fancy CRUD app with a database.
This is oversimplified but if you can create a to-do list you can make anything. I strongly encourage you to make any kind of CRUD app and practice reading and writing data first to memory using a simple variable and using local storage or a SQL database like Supabase to persist it.
If you think a to-do list is boring here are some other ideas:
- Content management system for your blog
- Organize and categorize books you’ve read in a bookshelf app
- Keep track of TV shows and movies you’re watching
- Add exercises with a set timer for your workout you can control using your voice
If what you’re doing solves a problem you have it’s going to be way more engaging and get you hooked into learning.
Practice Reading Documentation
Great documentation should get you started quick without making you read a book about it and teach you the important concepts without assuming your knowledge.
If your first experience reading documentation is negative that’s how you’re going to think abou every documentation and that’s why a lot of people avoid it.
You might prefer watching a video and that’s great but they work great together so have it open and the documentation is always going to be up to date while videos get outdated.
Take for example the MDN documentation for the array method map.
map((element, index, array) => { /* ... */ })It shows you the call signature for map and the parameters you can pass and explains what they mean. You also learn that map always returns an array, so you shouldn’t use it if you don’t want to return the value but use forEach or for...of instead and look at examples.
Documentation is your best friend.
If you find reading MDN hard to grok at first you can find a more friendlier version on W3Schools and ignore people who hate on it because it’s a great resource.
Another fantastic documentation resource for JavaScript is The Modern JavaScript Tutorial that you can always use as reference.
Don’t fall into the trap of having to learn everything because only doing is going to give you experience.
Question Everything
Asking questions is the fastest way to improve.
Avoid being isolated on your own island as you learn how to code. You should be among peers to give you a sense of togetherness and you’re going to feel a spark of excitement to improve and share what you learned with others and you can even make friends along the way.
If you’re already not a part of some Discord or Slack community then have a look if your favorite content creator or the course you’re taking has one you can join.
You should never feel bad about asking questions because everyone is a volunteer and it also helps them reinforce their understanding — anyone can answer questions including you and it’s alright to be wrong if you can learn from it.
Here’s a great tip when learning something and that’s commenting every line of code you don’t understand and asking questions.
Lets pretend I’m completely new to React and have no idea what’s going on.
function Component() {
	// what does this array syntax mean?
	const [message, setMessage] = useState('Hello, World!')

	// why is HTML in React?
	return <h1>{message}</h1>
}
From this simple example you can learn about the destructuring assignment that lets you unpack values from array and properties from objects into variable and JSX which is not HTML but JavaScript.
You should question everything because I’ve seen people skip JavaScript and confuse map for being a React thing when it’s not.
Take advantage of social media and places where developers aggregate like Twitter and start following smart people which is like having a mentor — you can peak into the mind of great developers and ask questions or learn useful tips and tricks and stay up to date.
Write About What You Learned
You should journal or write a post about what you learned.
There’s a misconception that you have to be some authority or expert to teach but the irony is that doing that is how you gain said authority and expertise.
When you put your thoughts to paper or type it out your brain has an easier time sorting and processing the information which helps you gather your thoughts and having to explain it to another human being means you have to understand it.
Use a platform such as DEV Community or Hashnode and don’t waste time on creating your blog unless you want to do that later for learning purposes. The great thing about these platforms is you can use a canonical URL to point at your blog meaning you get the SEO benefits.
I don’t have any hot tips on writing other than keep it simple and avoid confusing language to sound smart because you should serve the reader.
The biggest lesson for me is knowing what not to do after reading a tragic amount of posts that assume your knowledge — that’s why I write for myself.
Start by creating an outline and dump your brain on the page and then go over it and clean it up and leave it for a day to think about it before you publish it.
You can use the free version of Grammarly to catch low-hanging fruit and improve your writing.
Regardless what method you use I hope you learned more about problem solving and are able to use it in your next project.
Thanks for reading! 🏄️