The Magic Behind Shiki Magic Move Code Animations
Published Mar 30, 2026
Table of Contents
- The Magic Behind Shiki Magic Move
- Shiki Magic Move High-Level Overview
- The Core
- The Renderer
- Magic Move
The Magic Behind Shiki Magic Move
Shiki Magic Move is a great library for smoothly animated code blocks. I use it for slides in Animotion when making educational content.
I previously wrote about how to use it with TypeScript and making a custom Svelte renderer if you’re interested in reading about it.
The creator of the library Antfu wrote a great post The Magic in Shiki Magic Move where they give a high-level overview of how it works, but in this post I’m going to dive deeper and recreate a simple version to understand how it works.
Shiki Magic Move High-Level Overview
There are two main parts to how Shiki Magic Move works:
- The core library turns code strings into tokens using Shiki, then it keys the tokens, diffs the code strings to see what changed, and syncs the token keys to find matches.
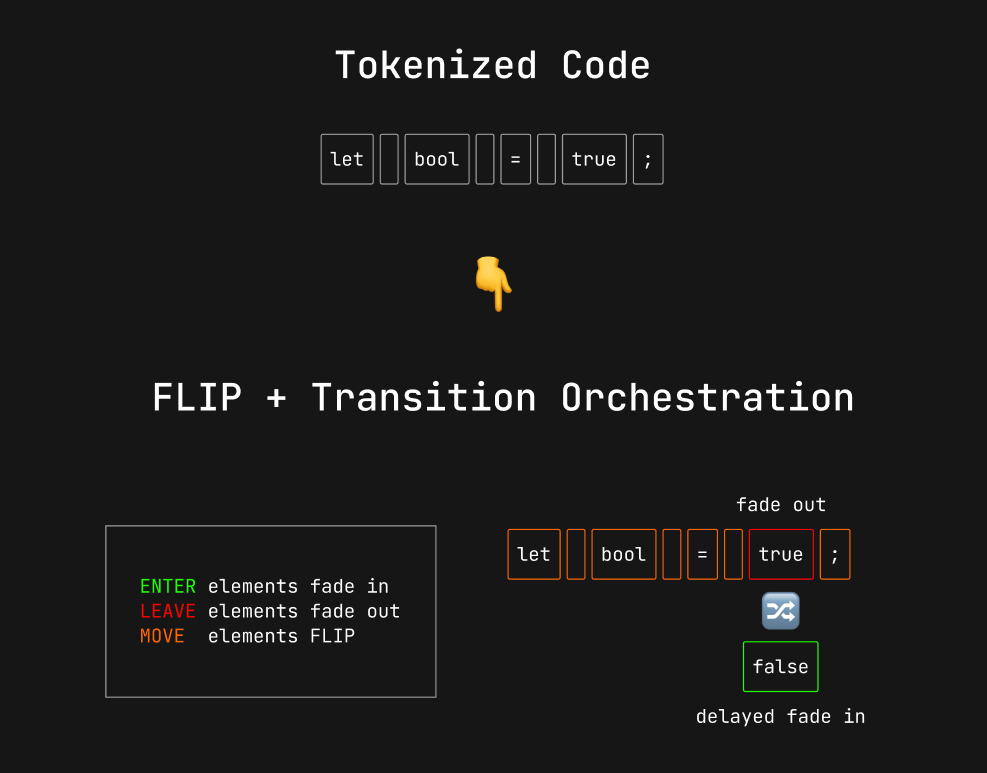
- The renderer maps keyed tokens to DOM elements, classifies them as move, enter, or leave, and schedules the CSS transitions.
I’m going to use JavaScript for legibility, but you can find the typed code on GitHub if you care about it. You can follow along and set up a Vite project if you run npm create vite@latest in your terminal.
The Core
Let’s start by creating the createMagicMoveMachine function which accepts a codeToKeyedTokens callback function and options — it’s main role is to return the previous and after state, and the commit function:
export function createMagicMoveMachine(codeToKeyedTokens, options = {}) {
	const EMPTY = toKeyedTokens('', []);
	let previous = EMPTY;
	let current = EMPTY;

	function commit(code, override) {
		previous = current;

		// override options
		const mergedOptions = override ? { ...options, ...override } : options;

		// create keyed tokens
		const newTokens = codeToKeyedTokens(code, mergedOptions.lineNumbers);

		// diff the code and match the keys
		// destructured values are assigned to `previous` and `current`
		({ from: previous, to: current } = syncTokenKeys(previous, newTokens, mergedOptions));

		return { previous, current };
	}

	return {
		get previous() {
				return previous;
		},
		get current() {
			return current;
		},
		commit,
	};
}
We can ignore toKeyedTokens for now because we just have an empty string and array of tokens when the function is created, so EMPTY returns an object with no tokens. We’re going to talk about what it does in a second.
codeToKeyedTokens
Later when we invoke commit('let bool = true;') it’s going to assign the previous state to current state and override any options you pass. The interesting part to us is the next line, which invokes codeToKeyedTokens and turns code strings into syntax highlighted tokens using the Shiki highlighter:
export function codeToKeyedTokens(highlighter, code, options, lineNumbers = false) {
// turn code string into tokens
const result = highlighter.codeToTokens(code, options);
return {
// pass code and tokens to `toKeyedTokens`
...toKeyedTokens(
code,
result.tokens,
// salt for the hash
JSON.stringify([options.lang, 'themes' in options ? options.themes : options.theme]),
lineNumbers,
),
// other properties used for rendering
bg: result.bg,
fg: result.fg,
rootStyle: result.rootStyle,
themeName: result.themeName,
lang: options.lang,
};
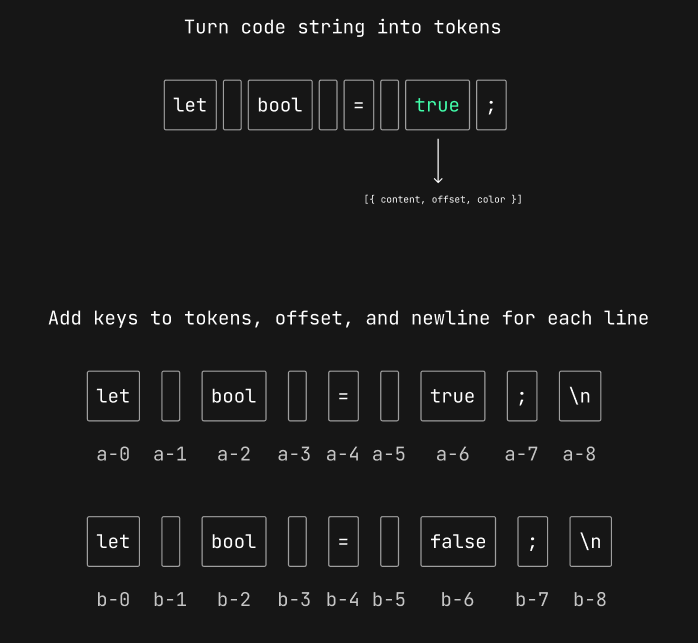
}Tokens are an array of objects which describe the code. For example the 'let bool = true;' string is turned into these tokens:
[
	{ "content": "let", "offset": 0, "color": "#91B4D5" },
	{ "content": " ", "offset": 3, "color": "#A6ACCD" },
	{ "content": "bool", "offset": 4, "color": "#E4F0FB" },
	{ "content": " ", "offset": 8, "color": "#A6ACCD" },
	{ "content": "=", "offset": 9, "color": "#91B4D5" },
	{ "content": " ", "offset": 10, "color": "#A6ACCD" },
	{ "content": "true", "offset": 11, "color": "#5DE4C7" },
	{ "content": ";", "offset": 15, "color": "#A6ACCD" }
]
toKeyedTokens
Now that we have the tokens, we can add keys to them. This is how we know which tokens changed. That’s where the toKeyedTokens function comes in.
The toKeyedTokens function accepts the code string and tokens. To make the key unique we use the options we passed as the salt to create a hash.
We use the flatMap function because tokens are two-dimensional arrays ([[...], [...]]) representing each line of code, so we flatten them to a single array. For each line of code we add a newline character with the correct offset. Then we map over each line (in our example there’s only one) and assign a unique key to each token:
import { hash as getHash } from 'ohash';

export function toKeyedTokens(code, tokens, salt = '', lineNumbers = false) {
	// unique hash
	const hash = getHash(code + salt);

	// keep track of last token position
	let lastOffset = 0;

	const keyed = tokens
		// add newline character for every line and flatten array
		.flatMap((line) => {
			// get last token from line
			const lastEl = line[line.length - 1];

			if (!lastEl) {
				// increment for empty line
				lastOffset += 1;
			} else {
				// calculate position of last token
				lastOffset = lastEl.offset + lastEl.content.length;
			}

			// add newline to end of line with the correct offset
			const tokens = [...line, { content: '\n', offset: lastOffset }];

			return tokens;
		})
		// add key to every token
		.map((token, idx) => {
			token.key ||= `${hash}-${idx}`;
			return token;
		});

	return {
		code,
		hash,
		tokens: keyed,
		lineNumbers,
	};
}
After we get newTokens from codeToKeyedTokens in the commit function, we move to the next step to sync the token keys by invoking the syncTokenKeys function.
syncTokenKeys
The syncTokenKeys function accepts from and to tokens, including options:
export function syncTokenKeys(from, to, options = {}) {
	const matches = findTextMatches(from.code, to.code, options);
	// ...
}
This is where the main diffing happens between the from.code and to.code strings inside the findTextMatches function. This can be ignored during the first render as there won’t be any matches because we’re comparing ' ' and 'let bool = true;'.
The findTextMatches function returns matched ranges for tokens so we know what changed. We’re going to look at the code in a second, but first let’s visualize how it works.
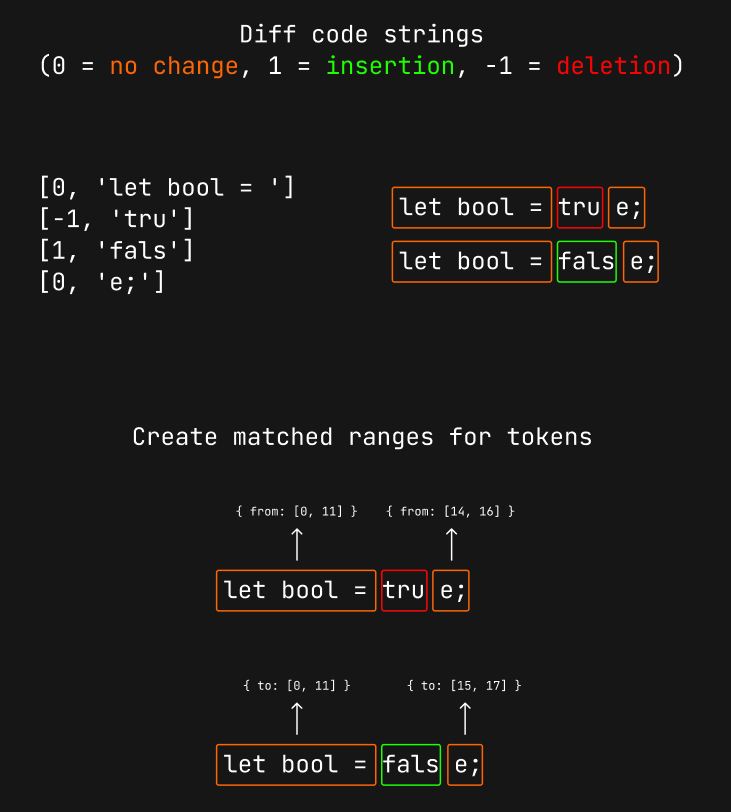
The actual diffing happens when we update the code and compare 'let bool = true;' with 'let bool = false;'. We know that 'let bool = ', and 'e;' remains the same (0 = no change), and 'true' was removed (-1 = deletion), while 'fals' was inserted (1 = insertion).
Using this we can create matched ranges for the tokens. let bool = is unchanged, so the start and end position remains [0, 11], while e; moved from [14, 16] to [15, 17].
This might not immediately make sense, but we’re going to use the matched ranges to create from and to tokens based on their offset from our pile of tokens.
Creating Matched Token Ranges
The findTextMatches function accepts a and b code strings as arguments alongside options and diffs them using the diff-match-patch-es library.
How matching works is that we iterate over the result and push matches to the matches array:
- The offset ranges are calculcated using the
AandBcolumn - Matches are added to both columns, deletions are added to the
Acolumn - Insertions are added to the
Bcolumn:
import { diff } from 'diff-match-patch-es';

export function findTextMatches(a, b, options = {}) {
	// 0 = no change, 1 = insertion, -1 = deletion
	let delta = diff(a, b);

	// you can pass a custom diffing function
	delta = options.diffCleanup?.(delta) || delta;

	// used to calculate the offset ranges for matches
	let aContent = '';
	let bContent = '';

	// matched ranges
	const matched = [];

	for (const [operation, text] of delta) {
		if (operation === 0) {
			// add match with offset
			matched.push({
				from: [aContent.length, aContent.length + text.length],
				to: [bContent.length, bContent.length + text.length],
				content: text,
			});
			// add to both columns
			aContent += text;
			bContent += text;
		} else if (operation === -1) {
			// add to A column
			aContent += text;
		} else if (operation === 1) {
			// add to B column
			bContent += text;
		}
	}

	if (aContent !== a || bContent !== b) throw new Error('Content mismatch');

	return matched;
}
This process creates the matched token ranges:
[
	{ "from": [0, 11], "to": [0, 11], "content": "let bool = " },
	{ "from": [14, 16], "to": [15, 17], "content": "e;" }
]
Now we can use this information to find the matching keys based on their content and make sure both tokens have the same key, so we know they should transition.
For each of the matches we get the tokensFrom and tokensTo based on the matched range. Next we loop over them, and if their content matches we assign the from token key to the to token key:
export function syncTokenKeys(from, to, options = {}) {
// get matched range
const matches = findTextMatches(from.code, to.code, options);
matches.forEach((match) => {
// get `from` tokens based on the matched range
const tokensFrom = from.tokens.filter(
(t) => t.offset >= match.from[0] && t.offset + t.content.length <= match.from[1],
);
// get `to` tokens based on the matched range
const tokensTo = to.tokens.filter(
(t) => t.offset >= match.to[0] && t.offset + t.content.length <= match.to[1],
);
let idxFrom = 0;
let idxTo = 0;
// token matching algorithm
while (idxFrom < tokensFrom.length && idxTo < tokensTo.length) {
// skip if no token
if (!tokensFrom[idxFrom] || !tokensTo[idxTo]) break;
if (tokensFrom[idxFrom].content === tokensTo[idxTo].content) {
// if match assign the FROM token key to the TO token key
tokensTo[idxTo].key = tokensFrom[idxFrom].key;
idxFrom++;
idxTo++;
} else if (tokensFrom[idxFrom + 1]?.content === tokensTo[idxTo].content) {
// skip try next
idxFrom++;
} else if (tokensFrom[idxFrom].content === tokensTo[idxTo + 1]?.content) {
// skip try next
idxTo++;
} else {
// no match next
idxFrom++;
idxTo++;
}
}
});
return { from, to };
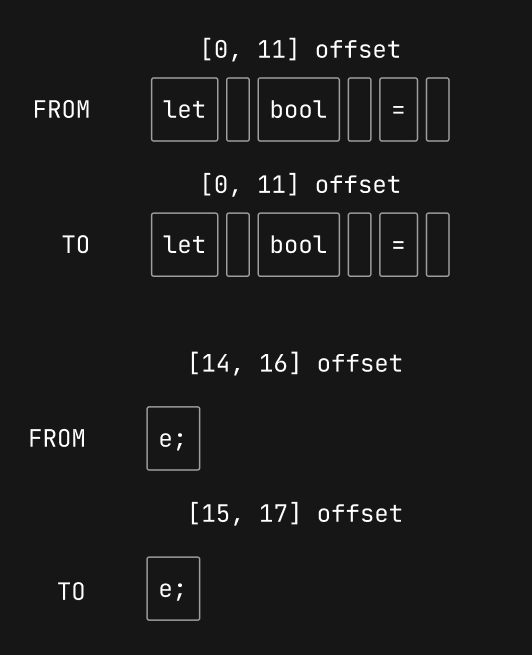
}Filtering the tokens works by taking a match like 'let bool = ' and filtering tokens based on the from and to range of [0, 11]. This returns 'let', ' ', 'bool', ' ', '=', ' ' tokens:
t.offset >= 0 && t.offset + t.content.length <= 11
t.offset >= 0 && t.offset + t.content.length <= 11
Note that we only filter for valid tokens. The second match e; has a from range of [14, 16] and to range of [15, 17]. This only returns the ; token:
t.offset >= 14 && t.offset + t.content.length <= 16
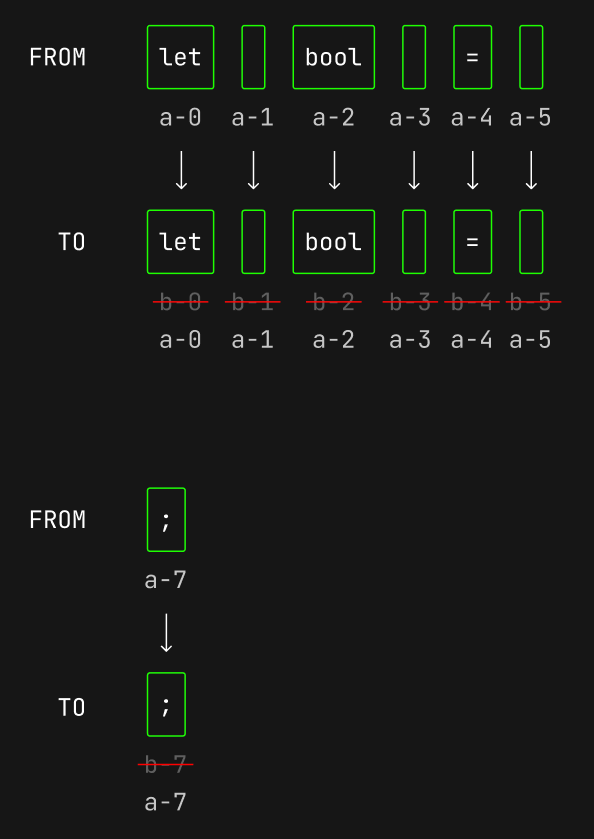
t.offset >= 15 && t.offset + t.content.length <= 17Now that we synchronized the token keys, we know which tokens should be moved, inserted, or delted based on the key (I omitted some properties and shortened the key name):
// FROM tokens
[
	{ content: "let", offset: 0, color: "#91B4D5", key: "a-0" },
	{ content: " ", offset: 3, color: "#A6ACCD", key: "a-1" },
	{ content: "bool", offset: 4, color: "#E4F0FB", key: "a-2" },
	{ content: " ", offset: 8, color: "#A6ACCD", key: "a-3" },
	{ content: "=", offset: 9, color: "#91B4D5", key: "a-4" },
	{ content: " ", offset: 10, color: "#A6ACCD", key: "a-5" },
	{ content: "true", offset: 11, color: "#5DE4C7", key: "a-6" },
	{ content: ";", offset: 15, color: "#A6ACCD", key: "a-7" },
	{ content: "\n", offset: 16, key: "a-8" }
]

// TO tokens
[
	{ content: "let", offset: 0, color: "#91B4D5", key: "a-0" },
	{ content: " ", offset: 3, color: "#A6ACCD", key: "a-1" },
	{ content: "bool", offset: 4, color: "#E4F0FB", key: "a-2" },
	{ content: " ", offset: 8, color: "#A6ACCD", key: "a-3" },
	{ content: "=", offset: 9, color: "#91B4D5", key: "a-4" },
	{ content: " ", offset: 10, color: "#A6ACCD", key: "a-5" },
	{ content: "false", offset: 11, color: "#D0679D", key: "b-6" },
	{ content: ";", offset: 16, color: "#A6ACCD", key: "a-7" },
	{ content: "\n", offset: 17, key: "b-8" }
]
That’s it! Now we update the previous and current keyed tokens using assignment destructuring:
({ from: previous, to: current } = syncTokenKeys(previous, newTokens, mergedOptions));This is the core of Shiki Magic Move. It turns a code string into tokens, keys the tokens, and diffs and syncs the token keys.
If you look at the Shiki Magic Move source code it also creates more granular tokens where it splits a token with whitespace like 'let ' into separate tokens 'let', ' '. It also supports line numbers and enhanced matching where it looks at unmatched tokens with the same content and assigns them the same key.
Now we can move to the rendering part.
The Renderer
The job of the renderer is to map the keyed tokens to DOM elements and orchestrate transitions.
Let’s start by creating a MagicMoveRenderer class which accepts a target element (to attach the code element) and render options. We also need a field for the DOM elements, the code container, and the anchor for measuring token element coordinates:
// default animation options
const defaultOptions = {
	duration: 500,
	delayMove: 0.3,
	delayLeave: 0.1,
	delayEnter: 0.7,
	easing: 'ease',
};

export class MagicMoveRenderer {
	// holds DOM elements to render
	mapDOM = new Map();
	// code container
	container;
	// we measure element x,y coordinates relative to anchor
	anchor;
	// keeps track of old transitions to cancel them if we run render again
	previousPromises = [];
	// avoid enter animation on first render
	isFirstRender = true;
	// animation options
	options;

	constructor(target, options = {}) {
		// merge options
		this.options = { ...defaultOptions, ...options };
		// assign container to target
		this.container = target;

		// create top left anchor
		this.anchor = document.createElement('span');
		this.anchor.style.position = 'absolute';
		this.anchor.style.top = '0';
		this.anchor.style.left = '0';
		this.anchor.style.height = '1px';
		this.anchor.style.width = '1px';
		this.container.prepend(this.anchor);
	}
}
The Render Method
Now we can create the render method which accepts the keyed tokens as a step:
export class MagicMoveRenderer {
	// ...
	render(step) {
		// ...
	}
}
The render method sets CSS variables on the container, creates a new map of the DOM, and sorts the token elements into move, enter, and leave arrays:
export class MagicMoveRenderer {
	// ...
	render(step) {
		// set CSS variables on container
		this.setCSSVariables();

		// create new map of the DOM
		const newDOMMap = new Map();

		// move tokens using FLIP
		const move = [];
		// enter tokens fade in
		const enter = [];
		// leave tokens fade out
		const leave = [];
		// ...
	}
}
This is how the setCSSVariables method looks like (the original source code also has container and stagger options among other things):
export class MagicMoveRenderer {
	// ...
	setCSSVariables() {
		this.container.style.setProperty('--smm-duration', `${this.options.duration}ms`);
		this.container.style.setProperty('--smm-delay-move', `${this.options.delayMove}`);
		this.container.style.setProperty('--smm-delay-leave', `${this.options.delayLeave}`);
		this.container.style.setProperty('--smm-delay-enter', `${this.options.delayEnter}`);
		this.container.style.setProperty('--smm-easing', this.options.easing);
	}
}
The initial render (when the render method is invoked with the current keyed tokens from machine.current) only creates DOM elements and applies the content and styles:
// class prefixes
const CLASS_PREFIX = 'shiki-magic-move';
const CLASS_LEAVE_TO = `${CLASS_PREFIX}-leave-to`;
const CLASS_LEAVE_ACTIVE = `${CLASS_PREFIX}-leave-active`;
const CLASS_ENTER_FROM = `${CLASS_PREFIX}-enter-from`;
const CLASS_ENTER_ACTIVE = `${CLASS_PREFIX}-enter-active`;
const CLASS_MOVE = `${CLASS_PREFIX}-move`;

export class MagicMoveRenderer {
	// ...
	render(step) {
		// ...
		const newChildren = step.tokens.map((token) => {
			if (this.mapDOM.has(token.key)) {
				// there are no existing DOM elements yet
			} else {
				const el = document.createElement(token.content === '\n' ? 'br' : 'span');
				this.applyElement(el, token);
				enter.push(el);
				newDOMMap.set(token.key, el);
				return el;
			}
		})

		// update DOM
		this.container.replaceChildren(this.anchor, ...newChildren, ...leave);
		this.mapDOM = newDOMMap;

		// don't play transitions on the first render
		this.isFirstRender = false;
		// ...
	}

	applyElement(el, token) {
		this.applyElementContent(el, token);
		this.applyElementStyle(el, token);
	}

	applyElementContent(el, token) {
		if (token.content !== '\n') {
			el.textContent = token.content;
			el.classList.add(`${CLASS_PREFIX}-item`);
		}
	}

	applyElementStyle(el, token) {
		if (token.color) el.style.color = token.color;
	}
}
The isFirstRender flag is going to make more sense when we look at how transitions are scheduled since we don’t want to play any transitions on the first render.
Recording Element Positions
Let’s go through the next step when we update the machine and invoke the render method with machine.current again. This time mapDOM has elements from the previous run, and we want to record their position relative to the anchor using getBoundingClientRect:
export class MagicMoveRenderer {
	// ...
	render(step) {
		// ...
		const position = new Map();
		const anchorRect = this.anchor.getBoundingClientRect();
		for (const el of this.mapDOM.values()) {
			const elRect = el.getBoundingClientRect();
			position.set(el, {
				x: elRect.x - anchorRect.x,
				y: elRect.y - anchorRect.y,
			});
		}
		// ...
	}
}
Classifying Transitions
Next we’re going to move existing elements to the newDOMMap and remove it from mapDOM:
export class MagicMoveRenderer {
	// ...
	render(step) {
		// ...
		// scheduled transitions
		const postReflow: (() => void)[] = [];

		const newChildren = step.tokens.map((token) => {
			if (this.mapDOM.has(token.key)) {
				const el = this.mapDOM.get(token.key)!;
				this.applyElementContent(el, token);
				// schedule element style transition
				postReflow.push(() => {
					this.applyElementStyle(el, token);
				});
				move.push(el);
				newDOMMap.set(token.key, el);
				this.mapDOM.delete(token.key);
				return el;
			} else {
				// create new element
			}
		});
		// ...
	}
}
Any transitions are scheduled for later using callbacks inside postReflow after we apply a transition class. This is going to make more sense when we look at how transitions are scheduled.
So far we pushed existing tokens to move, and newly created elements to enter. Anything left in mapDOM with a different key is pushed to leave and those elements are absolutely positioned (so we can place them in their original position):
export class MagicMoveRenderer {
	// ...
	render(step) {
		// ...
		// anything left in the DOM map should leave
		for (const [_, el] of this.mapDOM) {
			if (el.tagName === 'BR') continue
			leave.push(el)
		}

		// leave elements stay in DOM so we can fade them out
		for (const el of leave) el.style.position = 'absolute'

		// update DOM
		this.container.replaceChildren(this.anchor, ...newChildren, ...leave);
		this.mapDOM = newDOMMap;
		// ...
	}
}
Transition Orchestration
After we update the DOM we can handle the leave, enter, and move elements then schedule the transitions.
We set the leave elements to their previous position, add a class with a transition and delay then schedule the transition and cleanup:
export class MagicMoveRenderer {
	// ...
	render(step) {
		// ...
		// for transition cleanup
		const promises = [];

		leave.forEach((el) => {
			// remove it from the regular document flow
			el.style.position = 'absolute';

			// set it to the previous position
			const pos = position.get(el)!;
			el.style.top = `${pos.y}px`;
			el.style.left = `${pos.x}px`;

			// add transition with delay
			el.classList.add(CLASS_LEAVE_ACTIVE);

			// schedule transition
			postReflow.unshift(() => {
				// set opacity to zero
				el.classList.add(CLASS_LEAVE_TO);
			});

			// schedule cleanup
			promises.push(
				this.registerTransitionEnd(el, () => {
					el.classList.remove(CLASS_LEAVE_ACTIVE);
					el.remove();
				}),
			);
		});
		// ...
	}
}
For enter transitions we check isFirstRender since we don’t want to play transitions on the initial render. Then we add enter classes, and schedule the transition and cleanup:
export class MagicMoveRenderer {
	// ...
	render(step) {
		// ...
		if (!this.isFirstRender) {
			enter.forEach((el) => {
				// start at zero opacity
				el.classList.add(CLASS_ENTER_FROM);
				// add transition and delay
				el.classList.add(CLASS_ENTER_ACTIVE);

				// schedule transition
				postReflow.push(() => {
					// animate opacity
					el.classList.remove(CLASS_ENTER_FROM);
				});

				// schedule cleanup
				promises.push(
					this.registerTransitionEnd(el, () => {
						el.classList.remove(CLASS_ENTER_FROM);
						el.classList.remove(CLASS_ENTER_ACTIVE);
					}),
				);
			});
		}
		// ...
	}
}
For move transitions, we use the FLIP animation technique to create the illusion of elements moving between old and new positions. This is done by inverting the element’s position with a transform and then removing it to play the transition.
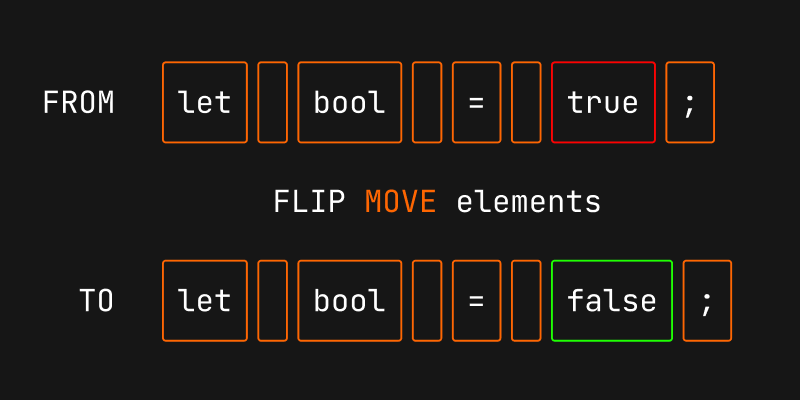
For example, to FLIP the ; element we:
- get the FIRST position
- get the LAST position
- INVERT element to FIRST position by applying a transform (
el.style.transform = translate(-100px, 0px)) - PLAY the scheduled transition by removing the transform (
el.style.transform = '')
export class MagicMoveRenderer {
	// ...
	render(step) {
		// ...
		move.forEach((el) => {
			// FIRST: get the initial position
			const oldPos = position.get(el)!;

			// LAST: get the last position
			const newRect = el.getBoundingClientRect();
			// position is relative to anchor if container size changes
			const newPos = {
				x: newRect.x - anchorRect.x,
				y: newRect.y - anchorRect.y,
			};

			// INVERT: set element to initial position
			const dx = oldPos.x - newPos.x;
			const dy = oldPos.y - newPos.y;

			// apply transform
			el.style.transform = `translate(${dx}px, ${dy}px)`;
			el.style.transitionDuration = el.style.transitionDelay = '0ms';

			// schedule transition
			postReflow.unshift(() => {
				// add transition
				el.classList.add(CLASS_MOVE);
				// PLAY: animate element to actual position
				el.style.transform = el.style.transitionDuration = el.style.transitionDelay = '';
			});

			// schedule cleanup
			promises.push(
				this.registerTransitionEnd(el, () => {
					el.classList.remove(CLASS_MOVE);
				}),
			);
			});
		// ...
	}
}
This is the ideal time to mention the Shiki Magic Move styles. These are required for the transitions to work:
Shiki Magic Move Styles
.shiki-magic-move-container {
	position: relative;
	white-space: pre;
}

.shiki-magic-move-line-number {
	opacity: 0.3;
	user-select: none;
}

.shiki-magic-move-item {
	display: inline-block;
	transition: color var(--smm-duration, 0.5s) var(--smm-easing, ease);
}

.shiki-magic-move-move {
	transition: all var(--smm-duration, 0.5s) var(--smm-easing, ease);
}

.shiki-magic-move-enter-active,
.shiki-magic-move-leave-active {
	transition: all var(--smm-duration, 0.5s) var(--smm-easing, ease);
}

.shiki-magic-move-container-resize,
.shiki-magic-move-container-restyle {
	transition: all var(--smm-duration, 0.5s) var(--smm-easing, ease);
	transition-delay: calc(var(--smm-duration, 0.5s) * var(--smm-delay-container, 1));
}

.shiki-magic-move-move {
	transition-delay: calc(
		calc(var(--smm-duration, 0.5s) * var(--smm-delay-move, 1)) + var(--smm-stagger, 0)
	);
	z-index: 1;
}

.shiki-magic-move-enter-active {
	transition-delay: calc(
		calc(var(--smm-duration, 0.5s) * var(--smm-delay-enter, 1)) + var(--smm-stagger, 0)
	);
	z-index: 1;
}

.shiki-magic-move-leave-active {
	transition-delay: calc(
		calc(var(--smm-duration, 0.5s) * var(--smm-delay-leave, 1)) + var(--smm-stagger, 0)
	);
}

.shiki-magic-move-enter-from,
.shiki-magic-move-leave-to {
	opacity: 0;
}

br.shiki-magic-move-leave-active {
	display: none;
}
The last thing left to do is apply the DOM layout changes, so they’re not batched by the browser (otherwise the transform would be ignored) by forcing a reflow and run the scheduled transitions:
export class MagicMoveRenderer {
	// ...
	render(step) {
		// ...
		// apply DOM layout changes
		this.forceReflow();
		// run the scheduled transitions
		postReflow.forEach((cb) => cb());
		// ...
	}

	forceReflow() {
		return document.body.offsetHeight;
	}
}
Transition Cleanup
A transition cleanup is a promise which runs after all the element transitions are done:
export class MagicMoveRenderer {
	// keeps track of old transitions to cancel them if we run render again
	previousPromises = [];
	// ...
	render(step) {
		// for transition cleanup
		const promises = [];

		// cancel old transitions
		this.previousPromises.forEach((promise) => promise.resolve());
		this.previousPromises = [];

		// later in the code...
		promises.push(
			this.registerTransitionEnd(el, () => {
				// ...
			}),
		);

		// DOM layout update and reflow...

		// run cleanup after transitions
		const actualPromises = promises.map((promise) => promise());
		// store for manual cleanup if another render is triggered
		this.previousPromises = actualPromises;

		// return promise for start and finish callbacks
		return Promise.all(actualPromises).then();
	}

	registerTransitionEnd(el, cb) {
		return () => {
			let resolved = false;
			let resolve = () => {};

			// race the promise so it can be canceled next render
			const promise = Promise.race([
				Promise.allSettled(el.getAnimations().map((a) => a.finished)).then(() => cb()),
				new Promise((r) => {
					resolve = () => {
						if (resolved) return;
						resolved = true;
						cb();
						r();
					};
				}),
			]);
			promise.resolve = resolve;
			return promise;
		};
	}
}
The render method returns a promise if you want to do some work before and after the transition is done.
The original implementation does more things like applying a stagger to the transitions, and animating the container size among other things.
Magic Move
You’re going to need Shiki for syntax higlighting, so don’t forget to install the package with npm i shiki.
Here’s a simple MagicMove class which creates a Shiki Magic Move instance and updates the code using the update method:
import { createHighlighter } from 'shiki';
import { codeToKeyedTokens, createMagicMoveMachine } from './shiki-magic-move/core';
import { MagicMoveRenderer } from './shiki-magic-move/renderer';
import './shiki-magic-move/style.css';

const highlighter = await createHighlighter({
	langs: ['ts'],
	themes: ['poimandres'],
});

class MagicMove {
	constructor(target, highlighter, code, options) {
		const { lang, theme, lineNumbers = false } = options;

		const pre = document.createElement('pre');
		pre.className = 'shiki-magic-move-container';
		target.appendChild(pre);

		// create the Shiki Magic Move machine
		this.machine = createMagicMoveMachine(
			(code) => codeToKeyedTokens(highlighter, code, { lang, theme }, lineNumbers),
			options,
		);

		// create the Shiki Magic Move renderer
		this.renderer = new MagicMoveRenderer(pre, options);

		// initial render
		this.update(code);
	}

	update(code: string) {
		this.machine.commit(code);
		this.renderer.render(this.machine.current);
	}
}
Here’s how it’s used:
const target = document.querySelector<HTMLDivElement>('#app')!;

const steps = {
	before: 'let bool = true;',
	after: 'let bool = false;',
};

const code = new MagicMove(target, highlighter, steps.before, {
	lang: 'ts',
	theme: 'poimandres',
});

let toggle = false;

document.addEventListener('click', () => {
	code.update(toggle ? steps.before : steps.after);
	toggle = !toggle;
});
That’s it! 😄