Dynamic Social Share Images
Published Oct 7, 2021
Table of Contents
Why Use Social Share Images
Using a social share image is important to make your content stand out in a feed when you link it on social media because it draws your attention and has a large actionable area.
In this post I’m going to show you a simple way how to automate that process, so that you’re able to art direct and quickly export one for your post using what you already know as a developer without involving a headless browser, or serverless.
Open Graph Meta Tags
If you’re unfamiliar with the open graph protocol it’s just metadata that represents the content of your site first created by Facebook. Some of the common <meta> tags include og:title, og:type, og:image, and og:url that are used to display information inside social cards.
<meta content="https://joyofcode.xyz/og-image.png" property="og:image" />Here is a Twitter example that displays the large card for Twitter Cards. Other services such as Discord can decide to also use these.
<meta content="summary_large_image" name="twitter:card" />
<meta content="https://joyofcode.xyz/og-image.png" name="twitter:image" />
Project Setup
We’re going to design the social share image with plain HTML and CSS, then take an optimized image of it that we can save.
We’re going to use Vite to initialize the project with vanilla TypeScript which is optional, so you can select vanilla if you prefer JavaScript and ignore types.
# initialize project
npm init vite@latest

# install dependencies
npm i

# start development server
npm run dev
HTML and CSS
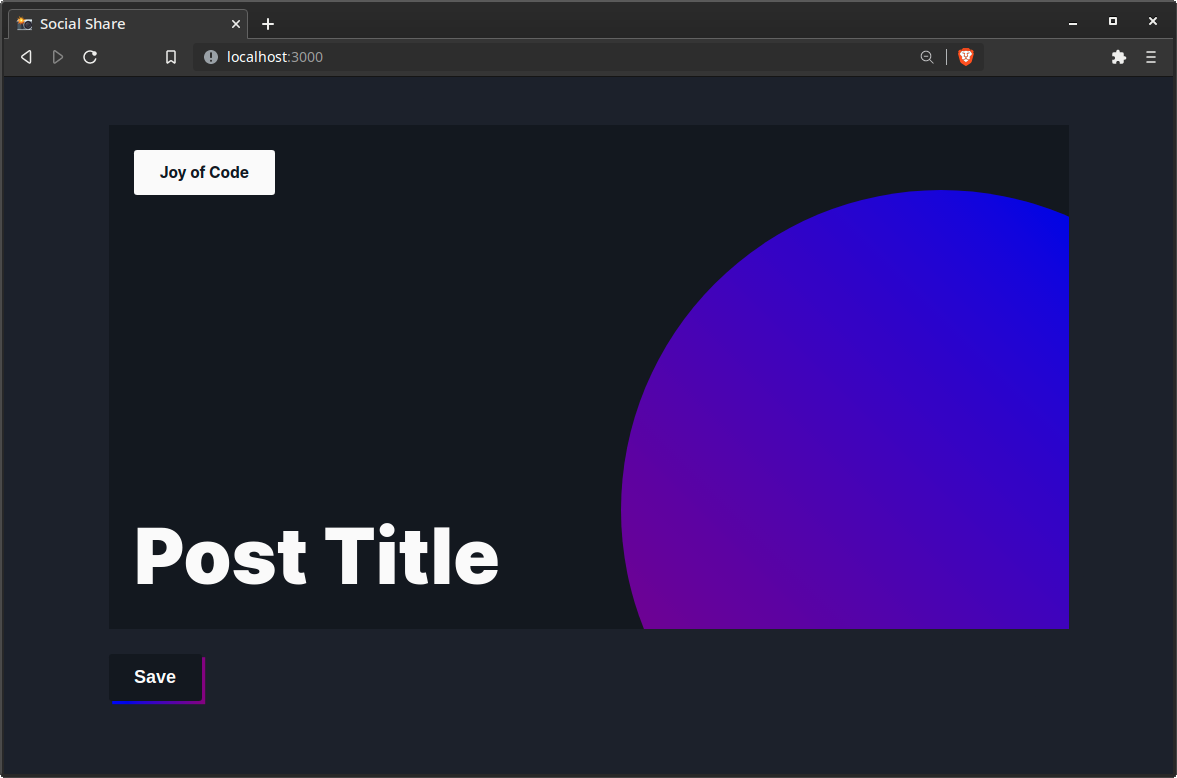
Let’s add some markup in index.html.
<div class="social" data-social>
<span class="social-site" contenteditable>Joy of Code</span>
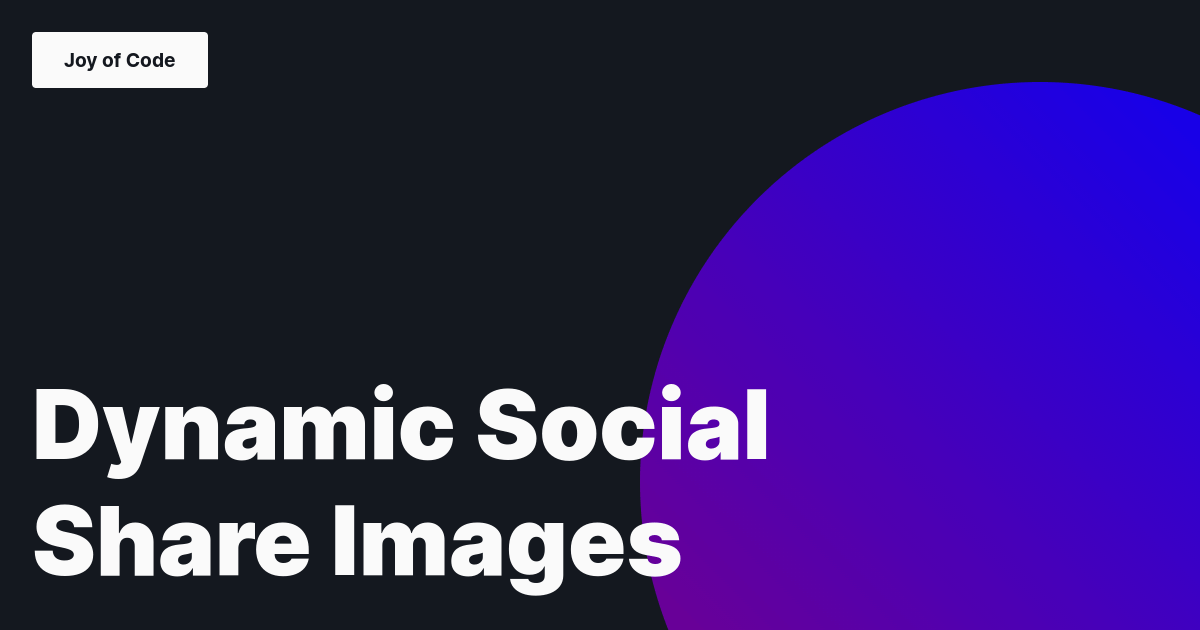
<h1 class="social-title" contenteditable>Post Title</h1>
</div>
<button data-save>Save</button>Thanks to the contenteditable attribute we can directly edit the text inside the element. We have to disable :focus because in Chrome it displays an outline which is going to end up in the final image.
For the styles we have to define a width and height of 1200x630 recommended by Facebook for social share images. We’re going to add some simple styles and add a design element for interest that can be a SVG, or a simple shape using CSS.
Feel free to experiment with the design of your card. You can find a lot of cool patterns from places such as Hero Patterns and unDraw, or use any SVG illustration site you like.
@import url('https://fonts.googleapis.com/css2?family=Inter:wght@400;700;900&display=swap');

* {
  margin: 0;
  padding: 0;
  box-sizing: border-box;
}

:root {
  --font-sans: 'Inter', sans-serif;

  --gray-10: hsl(220 20% 10%);
  --gray-14: hsl(220 20% 14%);
  --white-98: hsl(0 0% 98%);
  --blue-50: hsl(240 100% 50%);
  --purple-25: hsl(300 100% 25%);

  --spacing-1: 1rem;
  --spacing-2: 2rem;
  --radius: 4px;
}

html,
body {
  height: 100%;
}

body {
  display: grid;
  place-content: center;
  justify-items: start;
  font-family: var(--font-sans);
  color: var(--white-98);
  background-color: var(--gray-14);
}

button {
  position: relative;
  padding: var(--spacing-1) var(--spacing-2);
  margin: var(--spacing-2) 0;
  font-size: 1.4rem;
  font-weight: bold;
  color: var(--white-98);
  background-color: var(--gray-10);
  border: none;
  border-radius: var(--radius);
  cursor: pointer;
}

button::before {
  content: '';
  position: absolute;
  inset: 0;
  transform: translateY(4px) translateX(4px);
  background-image: linear-gradient(to right, var(--blue-50), var(--purple-25));
  z-index: -10;
}

.social {
  width: 1200px;
  height: 630px;
  display: flex;
  position: relative;
  flex-direction: column;
  align-items: flex-start;
  justify-content: space-between;
  padding: var(--spacing-2);
  background-color: var(--gray-10);
  overflow: hidden;
  z-index: 10;
}

.social::after {
  content: '';
  position: absolute;
  bottom: -40%;
  right: -20%;
  height: 800px;
  width: 800px;
  background-image: linear-gradient(
    to bottom left,
    var(--blue-50),
    var(--purple-25)
  );
  border-radius: 50%;
  z-index: -10;
}

.social-site {
  padding: var(--spacing-1) var(--spacing-2);
  font-size: 1.2rem;
  font-weight: 700;
  color: var(--gray-10);
  background-color: var(--white-98);
  border-radius: var(--radius);
}

.social-title {
  max-width: 80%;
  font-size: 6rem;
  font-weight: 900;
}

.social-site:focus,
.social-title:focus {
  outline: none;
}
JavaScript
Speaking of taking images 📸 we’re going to need html-to-image and browser-image-compression which is awesome because it works in the browser meaning we can deploy the site anywhere and use it as is.
npm i html-to-image browser-image-compressionInside main.ts we’re going to import the packages and attach a click event listener on the button.
import * as htmlToImage from 'html-to-image'
import imageCompression from 'browser-image-compression'

const socialElement = document.querySelector<HTMLDivElement>('[data-social]')!
const saveElement = document.querySelector<HTMLButtonElement>('[data-save]')!

saveElement.addEventListener('click', () => saveImage(socialElement))
We’re going to create a saveImage function that takes a HTML node as a parameter and then creates a Blob which is a file-like object that can be read as text or binary data which is something we can pass to be compressed.
You could use other simple html-to-image methods such as toPng if you just want to get the image.
Once we create the compressed file we’re going to create a URL from it using the window.URL.createObjectURL method that creates a URL object from a File, Blob, or MediaSource that looks like blob:http://localhost:3000/7fe50800-234c-496b-a336-51cff55c4308.
Lastly we’re going to create the <a> link tag, give the download a name of og-image.png and assign it to the href attribute. After that is done we’re going to use click on it to start the download.
This is going to happen each time you press Save.
async function saveImage(node: HTMLElement) {
  try {
    // create Blob from node
    const imageOptions = { width: 1200, height: 630 }
    const imageBlob = (await htmlToImage.toBlob(node, imageOptions)) as File

    // pass Blob and the quality option to be compressed
    const compressionOptions = { initialQuality: 1 }
    const compressedFile = await imageCompression(imageBlob, compressionOptions)

    // create URL from Blob
    const imageUrl = window.URL.createObjectURL(compressedFile)

    // download image
    const linkElement = document.createElement('a')
    linkElement.download = 'og-image.png'
    linkElement.href = imageUrl
    linkElement.click()
  } catch (error) {
    throw new Error(`Something went wrong: ${error}`)
  }
}
Depending how complex your image is the size may vary. In this example before compression the size is around 76 kB and after compression it’s around 14 kB.
The design I use for Joy of Code has a size of 400 kB before compression and 100 kB after. You can have a look at what I use for the site to create posts that generates the image and post front matter. Here’s the source code to the repository.
Conclusion
If you want to preview how your card looks on different sites use Social Share Preview. You can deploy this to anywhere like Netlify by simply pointing to your repository since it’s just a static site.
Thanks for reading! 🏄♀️